
Switching password managers sounds scary. What if you lose passwords? What if something breaks? What if you get locked out of important accounts?
Here is the truth: migrating password managers is way easier than you think. It is like moving your music from Spotify to Apple Music — a bit of effort, but everything transfers over.
We have migrated between every major password manager combination. This guide gives you exact step-by-step instructions so you do not lose a single password.
Before You Start: The 5-Minute Prep Checklist
Before touching any export buttons, do these 4 things. They take 5 minutes and prevent every common migration problem.
- Count your passwords — Open your current password manager and note the total number. After migration, you will compare this number to make sure nothing was lost.
- Write down your master password for the old manager — You will need it during export. Store it on paper, not digitally.
- Create your account on the new manager first — Set up your new 1Password, Bitwarden, or ProtonPass account before exporting anything.
- Close other apps — During migration, you will have an unencrypted file on your computer. Close messaging apps, cloud sync services (Dropbox, OneDrive), and browsers to prevent accidental upload.
Migration Compatibility: Who Can Go Where?
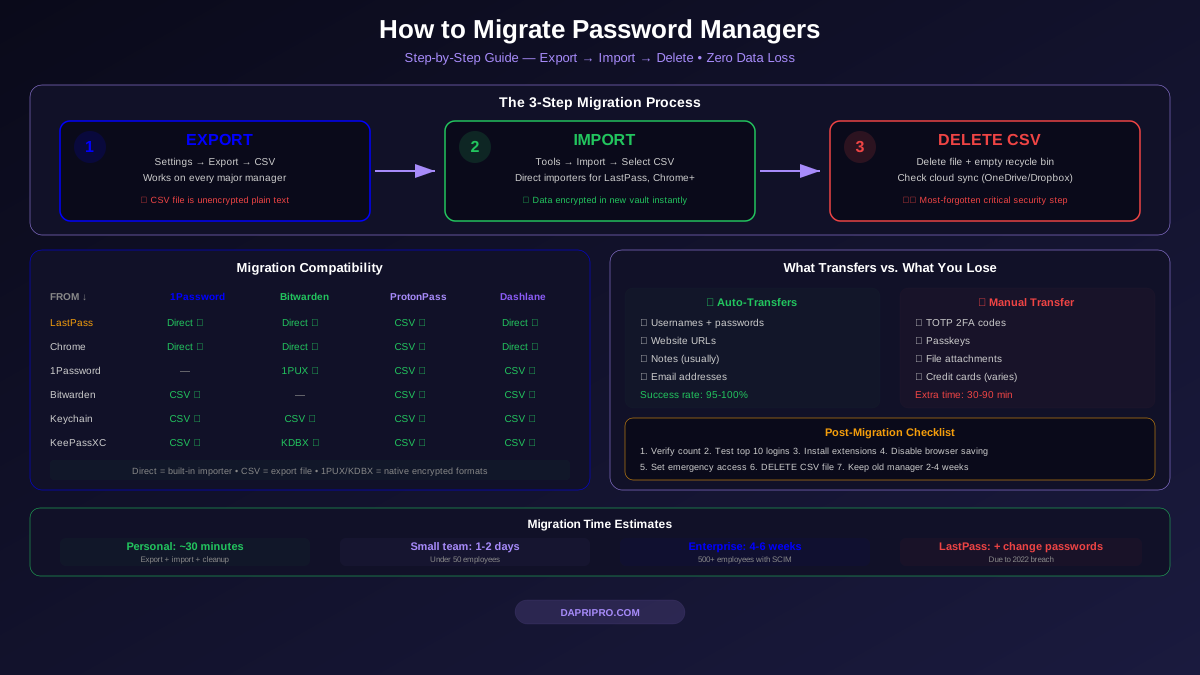
Good news: almost every password manager can export to CSV (a simple spreadsheet file), and almost every other manager can import from CSV. Here is the specific compatibility:
| From ↓ / To → | 1Password | Bitwarden | ProtonPass | Dashlane | NordPass |
|---|---|---|---|---|---|
| LastPass | ✅ Direct | ✅ Direct | ✅ CSV | ✅ Direct | ✅ CSV |
| Chrome / Edge | ✅ Direct | ✅ Direct | ✅ CSV | ✅ Direct | ✅ CSV |
| 1Password | — | ✅ 1PUX | ✅ CSV | ✅ CSV | ✅ CSV |
| Bitwarden | ✅ CSV | — | ✅ CSV | ✅ CSV | ✅ CSV |
| Dashlane | ✅ Direct | ✅ CSV | ✅ CSV | — | ✅ CSV |
| Keeper | ✅ CSV | ✅ CSV | ✅ CSV | ✅ CSV | ✅ CSV |
| Firefox | ✅ Direct | ✅ Direct | ✅ CSV | ✅ CSV | ✅ CSV |
| Apple Keychain | ✅ CSV | ✅ CSV | ✅ CSV | ✅ CSV | ✅ CSV |
| KeePassXC | ✅ CSV | ✅ KDBX | ✅ CSV | ✅ CSV | ✅ CSV |
"Direct" means the destination has a built-in importer specifically for that source. "CSV" means you export a CSV file and import it. "1PUX" is 1Password's encrypted export format. "KDBX" is KeePass's database format.
How to Migrate FROM LastPass (Most Common Migration)
After the 2022 breach, millions of LastPass users are switching. Here is exactly how to do it.
Step 1: Export from LastPass
- Go to lastpass.com and log in to your vault
- Click Advanced Options in the left sidebar
- Click Export
- Enter your master password when prompted
- A CSV file downloads to your computer (or the data appears in a browser tab — if so, press Ctrl+A to select all, Ctrl+C to copy, paste into Notepad, and save as a .csv file)
Important: LastPass's export does NOT include 2FA codes, file attachments, or secure notes in some formats. You will need to transfer those manually.
Step 2: Import into Your New Manager
If moving to 1Password:
- Open 1Password and go to File → Import
- Select LastPass from the list (1Password has a direct LastPass importer)
- Select your CSV file
- Choose which vault to import into
- Click Import — done!
If moving to Bitwarden:
- Log into vault.bitwarden.com
- Go to Tools → Import Data
- Select LastPass (csv) from the dropdown
- Upload your CSV file or paste the contents
- Click Import Data
If moving to ProtonPass:
- Open ProtonPass (web or desktop app)
- Go to Settings → Import
- Select LastPass as the source
- Upload your CSV file
- Review the preview and click Import
Step 3: Delete the CSV File (Do Not Skip This!)
That CSV file sitting on your computer contains every single password you own in plain text. Anyone who opens it can see everything. Here is how to properly delete it:
- Windows: Right-click the file → Delete → Empty the Recycle Bin
- Mac: Move to Trash → Empty Trash
- Extra secure: Use a file shredder tool that overwrites the data (like Eraser on Windows or
srmon Mac)
Step 4: The LastPass-Specific Critical Step
Because LastPass was breached, simply moving your passwords is not enough. The attackers have encrypted copies of your old vault. If your LastPass master password was weak, they could eventually crack it.
You need to change passwords on your most important accounts:
- Your bank and financial accounts
- Your email accounts (Gmail, Outlook)
- Your social media accounts
- Any account with personal or financial information
- Any account where you reused the same password
Yes, this is tedious. But your new password manager makes it easy — it will generate strong, unique passwords for each site as you change them.
How to Migrate FROM Chrome/Edge Saved Passwords
Chrome and Edge save passwords but do not encrypt them well. Here is how to move to a real password manager.
Export from Chrome
- Open Chrome and go to chrome://password-manager/settings
- Click Download file under "Export passwords"
- Enter your computer's password (not a Chrome password)
- Save the CSV file
Export from Edge
- Go to edge://settings/passwords
- Click the three dots menu → Export passwords
- Confirm and save the CSV file
Export from Firefox
- Open Firefox and go to about:logins
- Click the three dots menu → Export Logins
- Confirm the warning and save the CSV file
Export from Apple Keychain (Safari)
- Open System Settings → Passwords (macOS Ventura+) or Safari → Preferences → Passwords
- Authenticate with Touch ID or password
- Click the three dots menu → Export All Passwords
- Confirm and save the CSV file
Then import the CSV into your new password manager using the same import steps described above.
What Does NOT Transfer Automatically
CSV exports handle basic passwords perfectly, but some data needs manual transfer. Here is what you might lose and how to fix it:
| Data Type | Transfers via CSV? | What to Do |
|---|---|---|
| Usernames + Passwords | ✅ Yes | Transfers perfectly |
| Website URLs | ✅ Yes | Transfers perfectly |
| Notes on entries | ✅ Usually | Check after import |
| Folder/vault organization | ⚠ Sometimes | May need manual reorganization |
| TOTP 2FA codes | ❌ Rarely | Re-scan QR codes on each site |
| Credit card info | ⚠ Varies | Some managers export them, others do not |
| File attachments | ❌ No | Download and re-upload manually |
| Secure notes | ⚠ Sometimes | Check format compatibility |
| Passkeys | ❌ No | Re-register passkeys on each website |
| Shared vault permissions | ❌ No | Re-create sharing in new manager |
The biggest headache is TOTP 2FA codes. If you stored your 2FA codes in LastPass Authenticator or inside your password manager, you will need to log into each site, disable 2FA, and re-enable it using your new manager's 2FA feature. For accounts with many 2FA-protected sites, this can take an hour or more.
Post-Migration Checklist (Do Not Skip)
You have imported your passwords. Now do these 7 things in the next 48 hours:
1. Verify the Password Count
Compare the number of entries in your new manager against the old one. If you had 200 passwords in LastPass and only 195 in Bitwarden, find the missing 5. Common culprits: duplicate entries that got merged, or entries with unusual characters that caused import errors.
2. Test Your 10 Most Important Logins
Log into these accounts using your new password manager's autofill:
- Email (Gmail, Outlook)
- Bank/financial accounts
- Work accounts (Slack, Microsoft 365)
- Social media
- Amazon / online shopping
If autofill does not work on any site, check if the URL was imported correctly. Sometimes the imported URL is slightly different from what the site actually uses.
3. Install Browser Extensions
Install your new password manager's browser extension on every browser you use (Chrome, Firefox, Safari, Edge). On mobile, install the app and enable autofill in your phone's settings. Here is how:
- iPhone: Settings → Passwords → AutoFill Passwords → Select your new manager
- Android: Settings → Passwords → AutoFill service → Choose your new manager
4. Disable Browser Password Saving
Now that you have a proper password manager, stop your browser from saving passwords too. Having passwords in two places causes confusion.
- Chrome: Settings → Passwords → Turn off "Offer to save passwords"
- Firefox: Settings → Privacy → Logins and Passwords → Uncheck everything
- Safari: Preferences → AutoFill → Uncheck "User names and passwords"
- Edge: Settings → Passwords → Turn off "Offer to save passwords"
5. Set Up Emergency Access
This is the feature everyone ignores until it is too late. Set up a trusted contact who can access your vault if something happens to you. In 1Password, this is called "Recovery." In Bitwarden, it is "Emergency Access." The trusted person requests access, there is a waiting period (you set the length), and if you do not decline, they get in.
6. Delete the Export File
Did you delete the CSV file? Are you sure? Check your Downloads folder, Desktop, and Recycle Bin. Also check if your cloud sync (OneDrive, Google Drive, Dropbox) automatically backed it up. That unencrypted file is a ticking time bomb.
7. Keep the Old Manager Active (2-4 Weeks)
Do not cancel or delete your old password manager account immediately. Keep it active for 2-4 weeks. During this transition period, any password that does not autofill correctly in the new manager can be quickly found in the old one. After 4 weeks, if everything works, then delete the old account.
Migrating an Entire Company (Enterprise Tips)
Migrating 100+ employees is different from a personal migration. Here is the approach that works:
| Phase | Duration | Actions |
|---|---|---|
| Pilot | Week 1 | Migrate IT team first, document issues |
| Department rollout | Week 2-3 | One department per day, with IT support |
| Company-wide | Week 4 | Enable for remaining employees via SCIM |
| Cleanup | Week 5-6 | Remove old manager, audit shared vaults |
| Training | Week 7 | 15-min session per department on the new tool |
Pro tip: Use SCIM provisioning in your new manager. It automatically creates accounts for employees based on your company directory (Azure AD, Okta, Google Workspace). No manual account creation needed.
Troubleshooting Common Migration Problems
Problem: Some Passwords Did Not Import
This usually happens when passwords contain special characters like commas, quotes, or newlines that break the CSV format. Solution: Open the CSV file in a text editor (not Excel — Excel can corrupt the data), find the problematic entries, and manually add them to your new manager.
Problem: Duplicates Everywhere
If you imported twice or imported from multiple sources (Chrome + LastPass), you will have duplicates. Most password managers have a built-in duplicate detector. In Bitwarden, go to Tools → Vault Health Reports → Check for duplicates.
Problem: Autofill Does Not Work on Some Sites
The imported URL might not match the actual login page URL. For example, the import saved "example.com" but the login page is "login.example.com" or "accounts.example.com." Edit the entry in your new manager and update the URL.
Problem: 2FA Codes Are Missing
TOTP 2FA codes almost never transfer between managers. You need to go to each website, disable 2FA, and then re-enable it while scanning the QR code with your new manager. Yes, this is annoying. Do your most important accounts first (email, bank) and work through the rest over a week.
Best Migration Destinations in 2026
If you are switching, switch to one of these:
- 1Password — Easiest migration (direct importers for 15+ managers), best overall experience
- Bitwarden — Free option available, open source, self-hosting possible
- ProtonPass — Best privacy, unlimited email aliases, part of the Proton ecosystem
All three support CSV import from any source, have browser extensions for every major browser, and work on Windows, Mac, Linux, iOS, and Android.
The Bottom Line
Migrating password managers takes about 30 minutes for the actual transfer and another 30-60 minutes for cleanup. The hardest part is re-setting up 2FA codes — not the password migration itself.
If you are leaving LastPass after the breach, remember: just moving your passwords is not enough. You also need to change passwords on your important accounts because the attackers have encrypted copies of your old vault.
The best time to switch was right after the breach. The second best time is today. Pick your new manager, follow this guide, and you will be done before lunch.
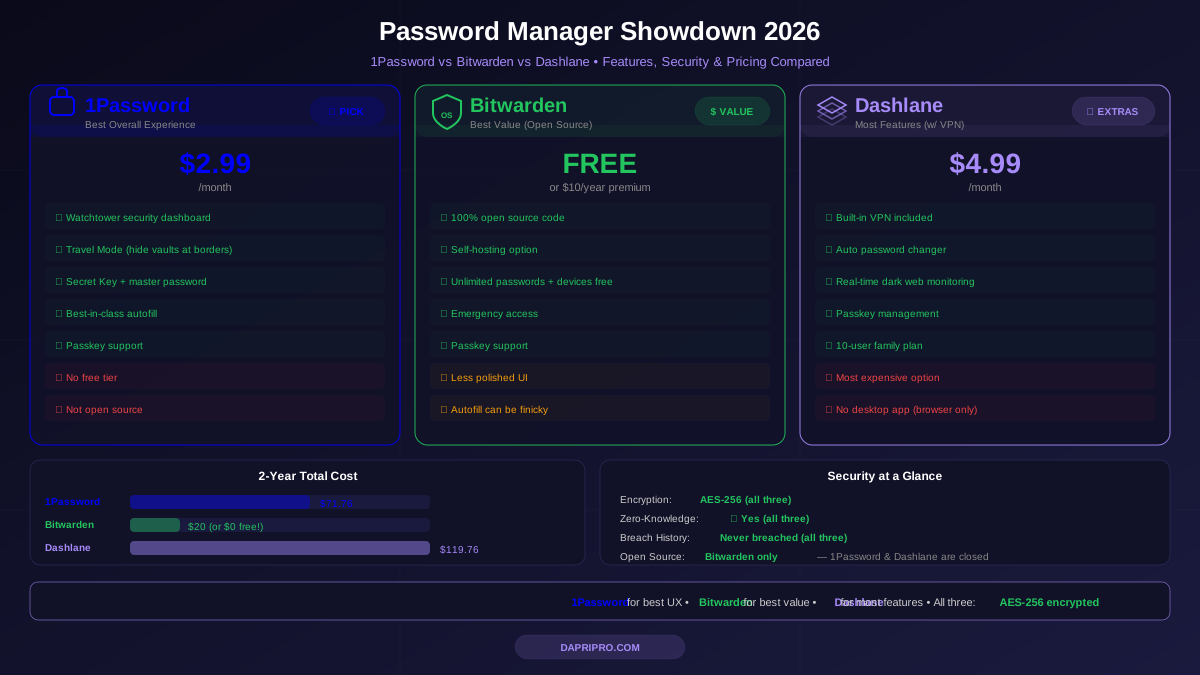
Need help choosing which manager to switch to? Check our 1Password vs Bitwarden vs Dashlane comparison.