
In 2013, attackers breached Target through an HVAC vendor's network connection. Once inside, they moved freely from the vendor segment to the point-of-sale systems. Forty million credit card numbers were stolen. The attack worked because the HVAC system and the payment system could talk to each other — even though there was no legitimate reason for them to communicate.
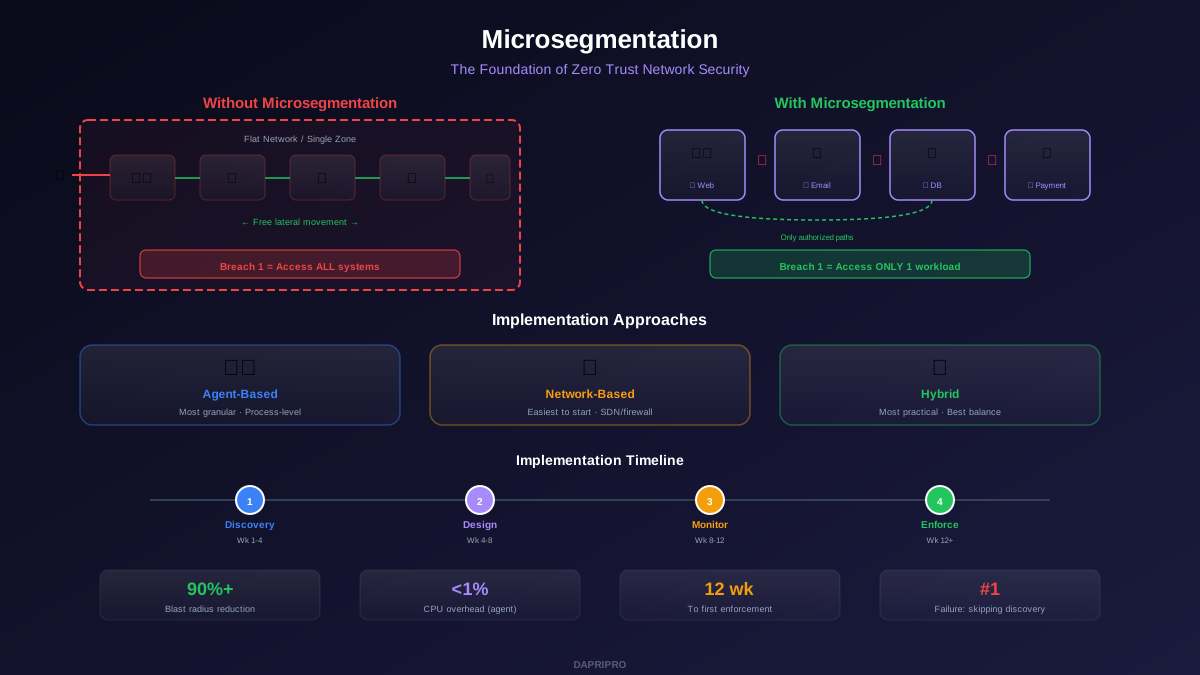
Microsegmentation exists to prevent exactly this. It divides your network into isolated zones so small that even if an attacker breaches one zone, they cannot reach anything else. Think of it as replacing the open floor plan with individual locked rooms — each server, container, or workload gets its own room, and the doors only open for specific, authorized visitors.
Segmentation vs Microsegmentation
Most organizations already have some form of network segmentation — VLANs that separate production from development, DMZ zones for internet-facing services, and firewall rules between major network zones. This is a good start, but it has a critical gap: everything inside each zone can communicate freely.
| Aspect | Network Segmentation | Microsegmentation |
|---|---|---|
| Granularity | 5-20 broad zones | Per-workload (thousands) |
| Enforcement | Perimeter firewalls, VLANs | Host-based agents, SDN, hypervisor |
| Lateral Movement | Free within zones | Blocked between all workloads |
| Policy Model | IP/subnet-based rules | Identity/label-based rules |
| Cloud Support | Limited (hardware-dependent) | Native (follows workloads) |
| Blast Radius | Entire zone exposed | Single workload contained |
How Microsegmentation Works
Microsegmentation creates security policies at the workload level rather than the network level. Instead of a firewall rule that says "allow traffic from VLAN 10 to VLAN 20," a microsegmentation policy says "allow the web server to communicate with the API server on port 443 only."
Label-Based Policies
Modern microsegmentation replaces IP-based rules with label-based (or tag-based) policies. Each workload is assigned labels describing its role, environment, and application. Policies reference labels, not IP addresses:
- Allow: Role=WebServer, App=Payments, Env=Production → Role=APIServer, App=Payments, Env=Production : Port 443
- Deny: All other traffic to Role=APIServer, App=Payments
This approach works equally well on-premises, in the cloud, and in containers — because the labels follow the workload regardless of where it runs or what IP address it has.
Three Implementation Approaches
1. Agent-Based (Host-Level). Software agents installed on each workload (server, VM, container) control traffic using the host firewall (iptables, Windows Firewall). This provides the finest granularity — down to individual process-level control. Solutions: Illumio, Akamai Guardicore.
2. Network-Based (Infrastructure-Level). Enforcement happens at the network switch, hypervisor, or SDN controller. No agents on workloads. Easier to deploy but less granular — controls at the IP/port level, not process level. Solutions: VMware NSX, Cisco ACI.
3. Hybrid. Agent-based for critical workloads (databases, payment systems, domain controllers) and network-based for everything else. This gives the best balance of security and manageability for most organizations.
Implementation in 4 Phases
Phase 1: Discovery (Weeks 1-4)
Deploy agents or monitoring tools in observe-only mode. The goal is to map every traffic flow: which workloads talk to which, on what ports, how often. This creates an application dependency map that is essential for writing policies that do not break things.
Do not skip this phase. The number-one reason microsegmentation projects fail is creating policies that block legitimate traffic because the organization did not know about undocumented dependencies.
Phase 2: Policy Design (Weeks 4-8)
Using the dependency map, create initial policies following the principle of deny by default, allow by exception:
- Group workloads by application and environment (prod, dev, staging)
- Create allow rules for every discovered legitimate traffic flow
- Start with the most critical applications: payment processing, customer databases, domain controllers, admin consoles
- Create policies that are initially more permissive (allow entire application groups to communicate), then tighten over time
Phase 3: Monitor Mode (Weeks 8-12)
Enable policies in monitor-and-alert mode. Policies are active but only log violations — they do not block traffic. This reveals any legitimate traffic flows missed during discovery. Fix policies based on alerts before moving to enforcement.
Phase 4: Enforcement (Week 12+)
Switch policies to enforcement mode, starting with the least risky segments and working toward the most critical. Have a rollback plan for every enforcement change. Monitor closely for 48 hours after each enforcement activation.
What to Microsegment First
You do not need to microsegment your entire network at once. Start with the highest-value targets:
| Priority | Workload Type | Why It Matters |
|---|---|---|
| Critical | Domain controllers, AD servers | Attackers target these first for full network takeover |
| Critical | Payment/financial systems | Direct monetary and compliance impact |
| High | Customer databases (PII) | Regulatory requirements (GDPR, CCPA) |
| High | Admin/jump servers | Privileged access to other systems |
| Medium | Development/staging environments | Often have lower security but network access to production |
Microsegmentation is the technical backbone of zero trust. Without it, zero trust is just an access control exercise — you verify the user but let them roam freely once inside. With microsegmentation, even a verified user with legitimate access can only reach the specific workloads their role requires. The blast radius of any compromise — whether from an external attacker or an insider threat — shrinks from "the entire network" to "a single workload." That is the difference between a headline breach and a contained incident.