
Kali Linux is the Swiss Army knife of penetration testing. It comes packed with over 600 security tools, ready to use right after installation. But opening Kali for the first time can feel overwhelming — hundreds of tools, unfamiliar menus, and no clear starting point.
This guide walks you through setting up Kali Linux the right way, shows you which tools actually matter (most pen testers use about 20 regularly), and helps you avoid the setup mistakes that waste hours. By the end, you will have a working pen testing lab ready for your first engagement.
Choosing Your Installation Method
Before downloading anything, you need to decide how to run Kali. Each method has trade-offs:
| Method | Best For | Pros | Cons |
|---|---|---|---|
| Virtual Machine (VM) | Beginners, learning | Safe, snapshots, runs alongside your OS | Slightly slower, no direct hardware access |
| WSL2 (Windows) | Windows users, quick access | Fastest setup, runs in Windows terminal | No GUI by default, some tools limited |
| Dual Boot | Serious pen testers | Full hardware access, best performance | Risk to main OS, slower to switch |
| Live USB | Testing on the go | No installation needed, portable | No persistence (changes lost on reboot) |
| Bare Metal | Dedicated pen test laptop | Best performance, full hardware support | Cannot use other OSes on same machine |
| Cloud (AWS/Azure) | Remote testing, teams | Access from anywhere, scalable power | Monthly cost, network latency |
Our recommendation for beginners: Start with a VM using VirtualBox (free) or VMware Workstation Player (free for personal use). You can break things, restore from snapshots, and keep your main OS safe.
Setting Up Kali in a Virtual Machine (Step by Step)
This is the most popular installation method. Here is exactly how to do it:
Step 1: Download What You Need
- Download VirtualBox from virtualbox.org (free, works on Windows, macOS, and Linux)
- Download the Kali Linux pre-built VM image from kali.org/get-kali — choose the "Virtual Machines" tab and select VirtualBox 64-bit
- The pre-built image is about 3.5GB compressed and contains a ready-to-run Kali installation
Step 2: Import the VM
- Open VirtualBox → File → Import Appliance
- Select the downloaded .ova file
- Before importing, increase the RAM to at least 4GB (4096 MB) and CPU cores to 2
- Click Import and wait 2-3 minutes
Step 3: First Boot Configuration
- Start the VM. Default login: username kali, password kali
- Change the default password immediately: open a terminal and type passwd
- Update everything: sudo apt update && sudo apt full-upgrade -y (this takes 10-30 minutes depending on your internet speed)
- Take a snapshot: In VirtualBox, go to Machine → Take Snapshot. Name it "Clean Install." If anything breaks later, you can restore to this point in seconds
Step 4: Install VirtualBox Guest Additions
Guest Additions gives you better screen resolution, shared clipboard (copy-paste between host and VM), and shared folders. In the VM menu: Devices → Insert Guest Additions CD Image → open a terminal → run sudo apt install -y virtualbox-guest-x11 then reboot.
Setting Up Kali on WSL2 (Windows 11)
WSL2 is the fastest way to get Kali running on Windows. It takes about 5 minutes:
- Open PowerShell as Administrator
- Run: wsl --install -d kali-linux
- Wait for the download and set up your username/password when prompted
- Run: sudo apt update && sudo apt install -y kali-linux-headless (installs the core pen testing tools without GUI)
- For GUI apps, install Win-Kex: sudo apt install -y kali-win-kex then launch with kex --win -s
WSL2 limitations: Raw packet injection (needed for some wireless attacks) does not work. USB passthrough is limited. If you need these capabilities, use a VM or dual boot instead.
The 20 Essential Kali Linux Tools (Organized by Phase)
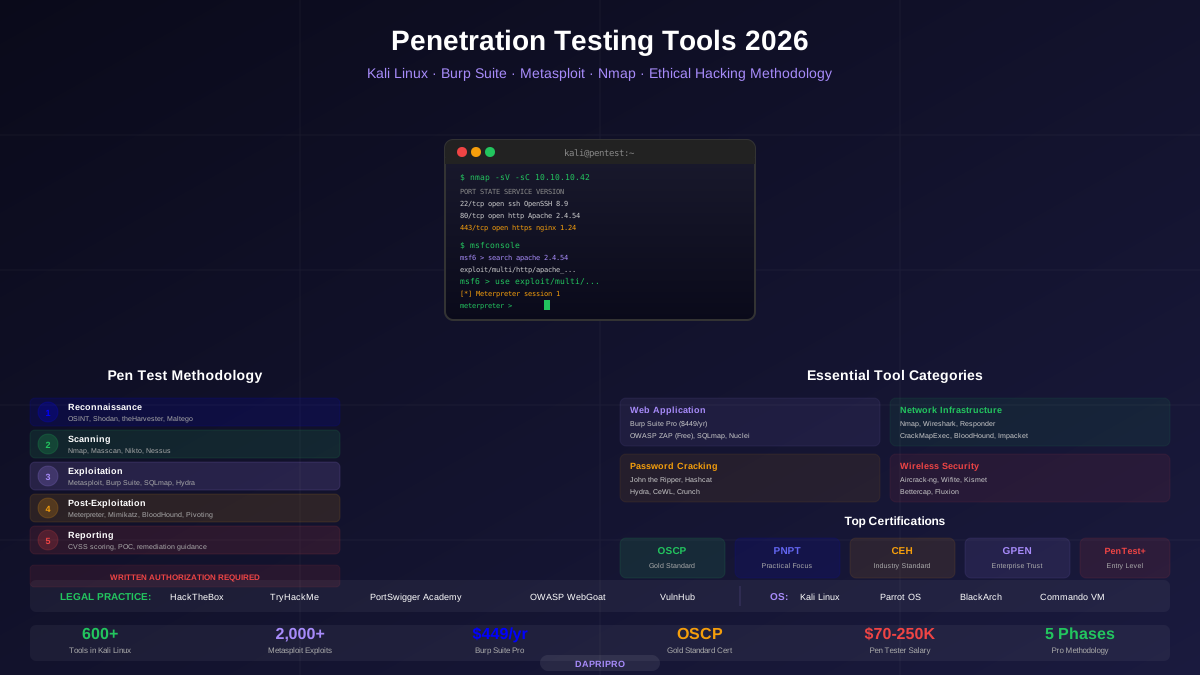
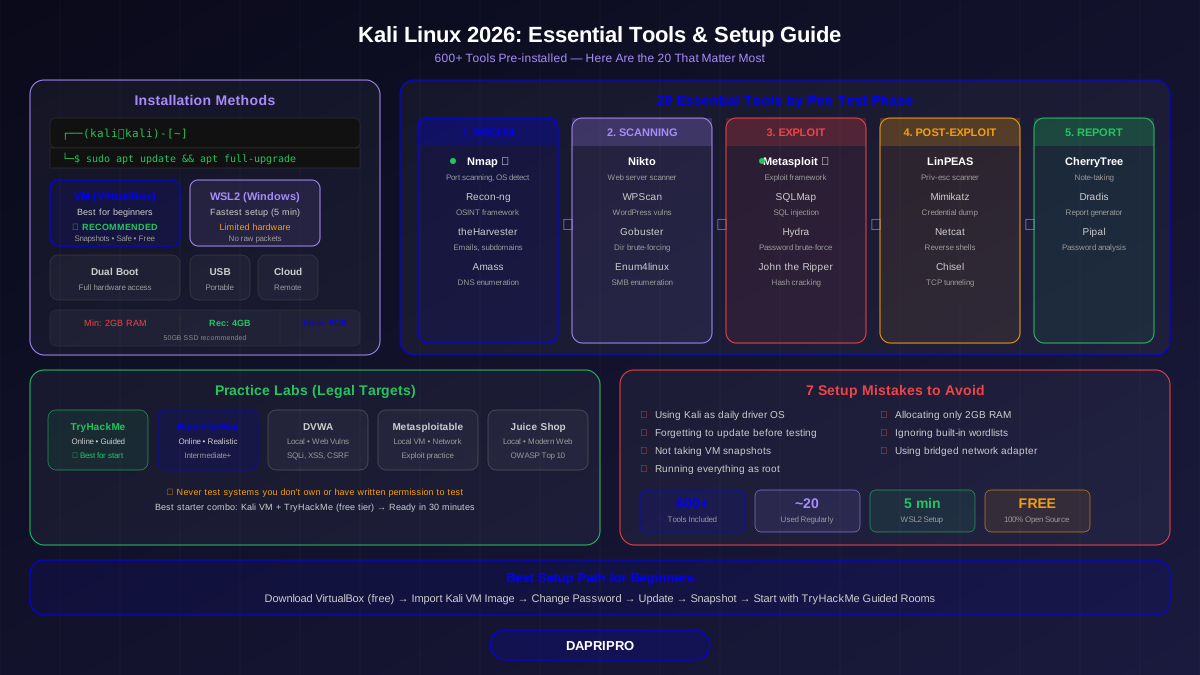
Kali includes 600+ tools, but most penetration testers regularly use about 20. Here they are, organized by the phase of a pen test where you would use them:
Phase 1: Reconnaissance (Gathering Information)
| Tool | What It Does | Example Command |
|---|---|---|
| Nmap | Scans networks and discovers open ports, services, and OS versions | nmap -sV -sC -oN scan.txt target.com |
| Recon-ng | Web reconnaissance framework — searches OSINT databases for subdomains, emails, contacts | recon-ng → marketplace install all |
| theHarvester | Finds emails, subdomains, and IPs associated with a domain | theHarvester -d target.com -b all |
| Amass | Advanced subdomain enumeration using DNS, scraping, and APIs | amass enum -d target.com -o subs.txt |
Nmap is the single most important tool. It is the first thing you run on almost every engagement. Learn its flags thoroughly — the difference between a basic scan and a properly configured Nmap scan is the difference between finding 5 services and finding 50.
Phase 2: Scanning and Vulnerability Assessment
| Tool | What It Does | Example Command |
|---|---|---|
| Nikto | Web server scanner — finds outdated software, dangerous files, and misconfigurations | nikto -h target.com -o report.html |
| WPScan | WordPress vulnerability scanner — finds plugin/theme/core vulnerabilities | wpscan --url target.com --api-token YOUR_KEY |
| Enum4linux | Windows/Samba enumeration — extracts user lists, shares, policies | enum4linux -a target-ip |
| Dirb/Gobuster | Directory brute forcing — finds hidden directories and files on web servers | gobuster dir -u target.com -w /usr/share/wordlists/dirb/common.txt |
Phase 3: Exploitation
| Tool | What It Does | Example Command |
|---|---|---|
| Metasploit | The biggest exploitation framework — thousands of exploits, payloads, and auxiliary modules | msfconsole → search type:exploit platform:windows |
| SQLMap | Automated SQL injection tool — detects and exploits SQLi in web apps | sqlmap -u "target.com/page?id=1" --dbs |
| Hydra | Password brute-forcing tool — supports 50+ protocols (SSH, FTP, HTTP, etc.) | hydra -l admin -P passwords.txt target.com ssh |
| John the Ripper | Password hash cracker — supports hundreds of hash formats | john --wordlist=rockyou.txt hashes.txt |
Phase 4: Post-Exploitation
| Tool | What It Does | Example Command |
|---|---|---|
| LinPEAS/WinPEAS | Automated privilege escalation scanner — finds misconfigurations that let you become admin/root | ./linpeas.sh | tee output.txt |
| Mimikatz | Extracts passwords, hashes, and Kerberos tickets from Windows memory (run on compromised Windows target) | mimikatz.exe → sekurlsa::logonpasswords |
| Netcat | Network utility — create reverse shells, transfer files, port scanning | nc -lvnp 4444 (listener for reverse shell) |
| Chisel | TCP tunnel/proxy — creates encrypted tunnels to pivot through compromised machines | chisel server -p 8080 --reverse |
Phase 5: Reporting and Documentation
| Tool | What It Does | Why It Matters |
|---|---|---|
| CherryTree | Hierarchical note-taking app — organize findings by target, phase, and severity | Best way to take notes during a test. Export to HTML/PDF for reports. |
| Dradis | Collaborative reporting framework — imports tool outputs, generates professional reports | Saves hours on report writing. Supports multiple team members. |
| Pipal | Password analysis tool — analyzes cracked password patterns | Shows clients their password weaknesses with statistics. |
Building Your Practice Lab
You cannot practice pen testing on real websites (that is illegal). Instead, build a practice lab using intentionally vulnerable applications:
| Lab Resource | Type | Best For Learning | Setup Difficulty |
|---|---|---|---|
| TryHackMe | Online platform | Complete beginners (guided rooms) | None (browser-based) |
| HackTheBox | Online platform | Intermediate+ (realistic machines) | None (browser-based) |
| DVWA | Local web app | Web vulnerabilities (SQLi, XSS, etc.) | Easy (Docker) |
| Metasploitable 2/3 | Local VM | Network exploitation | Easy (VM import) |
| Juice Shop | Local web app | Modern web app security | Easy (Docker or Node.js) |
| VulnHub | Downloadable VMs | Realistic CTF-style machines | Medium |
The best starter setup: Kali Linux VM + TryHackMe free tier. TryHackMe provides Kali instances directly in your browser, so you can start learning within minutes without any local setup. When you are ready for more control, build a local lab with DVWA and Metasploitable 2 running as VMs on the same virtual network as your Kali VM.
7 Common Kali Setup Mistakes (and How to Fix Them)
- Using Kali as your daily driver. Kali is not designed for everyday use. It prioritizes pen testing over usability. Use Ubuntu, Fedora, or Windows for daily tasks, and switch to Kali only for security testing.
- Forgetting to update before testing. Tool databases change constantly. Running an outdated Nmap or Metasploit version means missing new vulnerability checks. Always run sudo apt update && sudo apt full-upgrade before any engagement.
- Not taking VM snapshots. Kali updates can sometimes break tools. Before major updates or configuration changes, take a VM snapshot. It takes 2 seconds and saves hours of troubleshooting.
- Running everything as root. Kali 2020+ uses a non-root user by default. Some older tutorials tell you to run everything as root — this is dangerous and unnecessary. Use sudo for commands that need elevated privileges.
- Allocating too little RAM. Kali with 2GB RAM runs, but tools like Metasploit and Burp Suite crawl. Give your Kali VM at least 4GB for a smooth experience. 8GB is ideal.
- Ignoring the wordlists. Kali includes wordlists in /usr/share/wordlists/ — rockyou.txt alone has 14 million passwords. But you need to decompress it first: sudo gunzip /usr/share/wordlists/rockyou.txt.gz. Many beginners waste time downloading external wordlists that are already included.
- Not configuring the network adapter. In VirtualBox, set your network adapter to "NAT" for internet access or "Internal Network" for isolated lab testing. Using "Bridged" puts your Kali VM on your real network — dangerous if you are running scan tools.
Your First Pen Test: A Walkthrough
Here is a simplified walkthrough of testing a practice target (like DVWA running on your local lab):
- Scan the target: nmap -sV -sC 192.168.1.100 — This finds open ports and identifies services (like Apache 2.4 on port 80).
- Check web for vulnerabilities: nikto -h http://192.168.1.100 — This finds outdated software, dangerous default files, and misconfigurations.
- Brute force directories: gobuster dir -u http://192.168.1.100 -w /usr/share/wordlists/dirb/common.txt — Finds hidden pages like /admin, /backup, /config.
- Test for SQL injection: sqlmap -u "http://192.168.1.100/page.php?id=1" --dbs — Automatically tests if the parameter is vulnerable and dumps database names.
- Document everything: Open CherryTree, create a tree structure for the target, and paste every command and output. Screenshots are essential for your report.
This basic workflow introduces you to the core rhythm of penetration testing: discover, scan, exploit, document. Every professional engagement follows this same pattern, just at a much larger scale.
What to Learn Next
Once your Kali setup is running smoothly and you have completed a few practice targets:
- Deep dive into Nmap: Learn about NSE scripts, timing options, and stealth scanning techniques
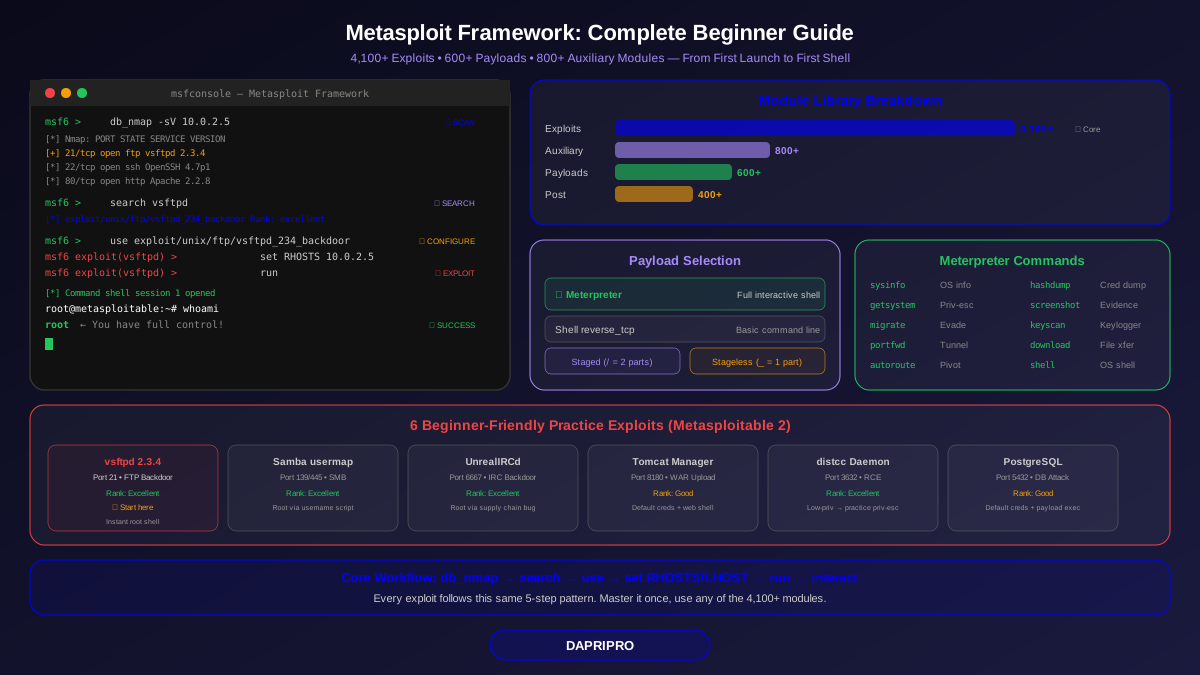
- Master Metasploit: Our complete Metasploit beginner guide covers the framework from first launch to your first exploit
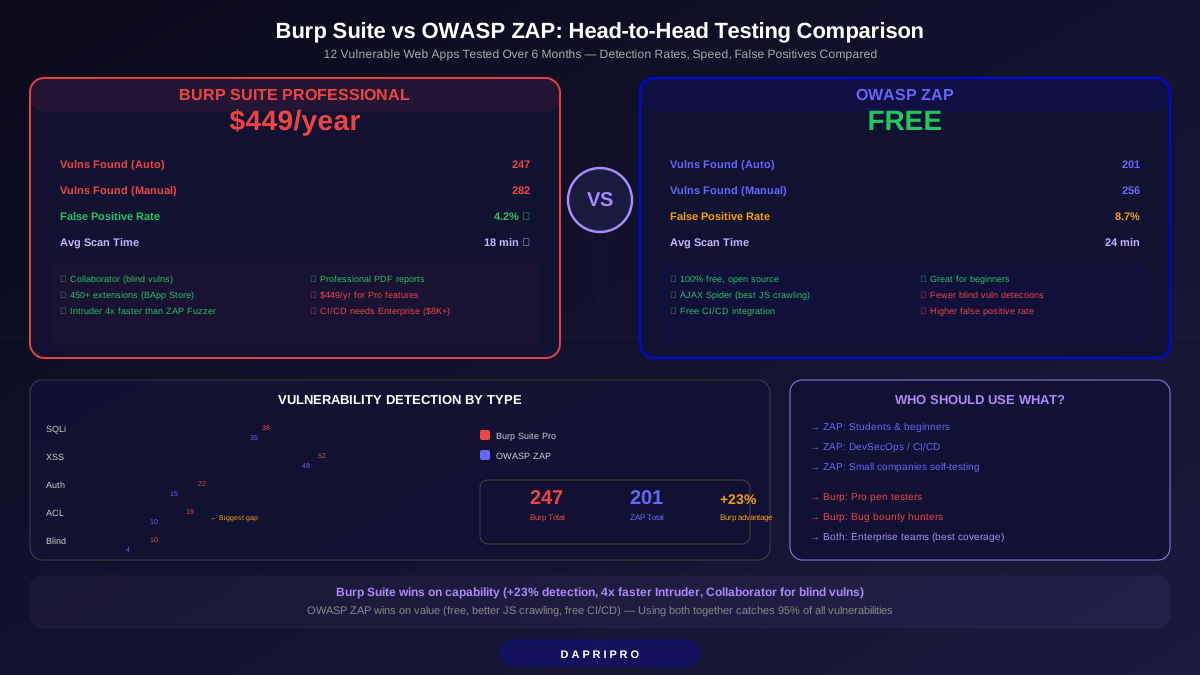
- Learn web application testing: Burp Suite and OWASP ZAP are essential — see our head-to-head comparison
- Get certified: CompTIA PenTest+, eJPT (eLearnSecurity), and OSCP (Offensive Security) are the most recognized pen testing certifications
- Join the community: TryHackMe, HackTheBox, and CTF competitions are the best ways to practice and connect with other pen testers
Kali Linux is just the beginning. The tools are important, but the methodology and mindset of a penetration tester matter more. Learn to think like an attacker, and the tools become simply the instruments you use to prove what is possible.