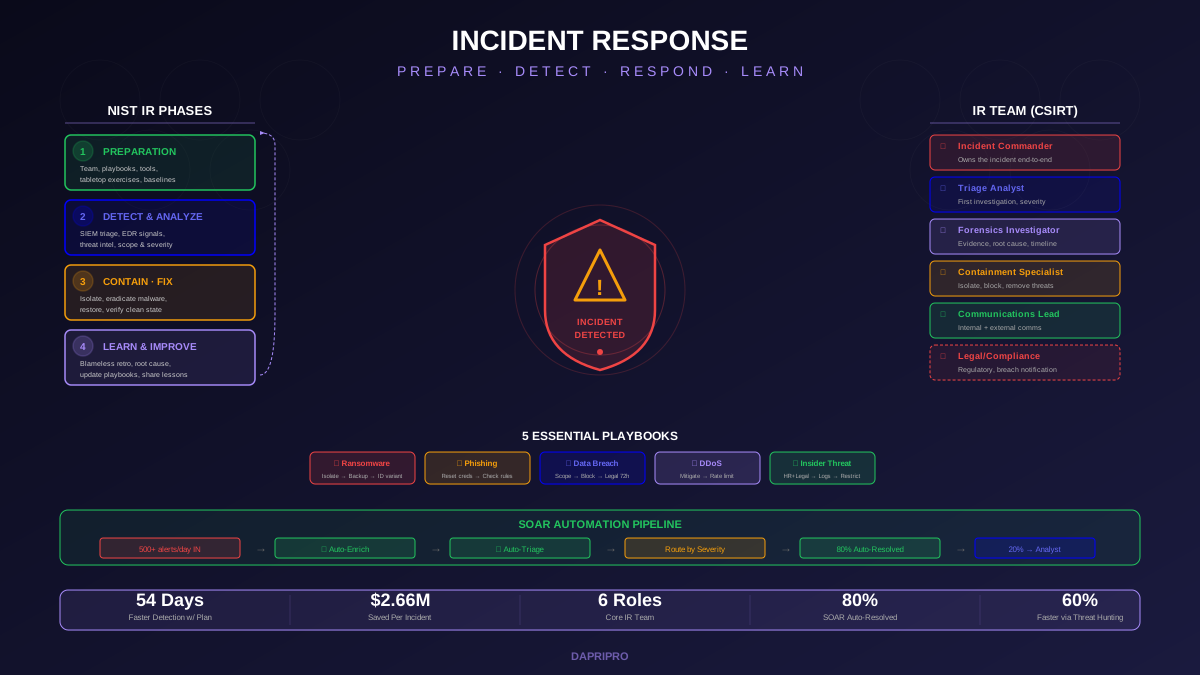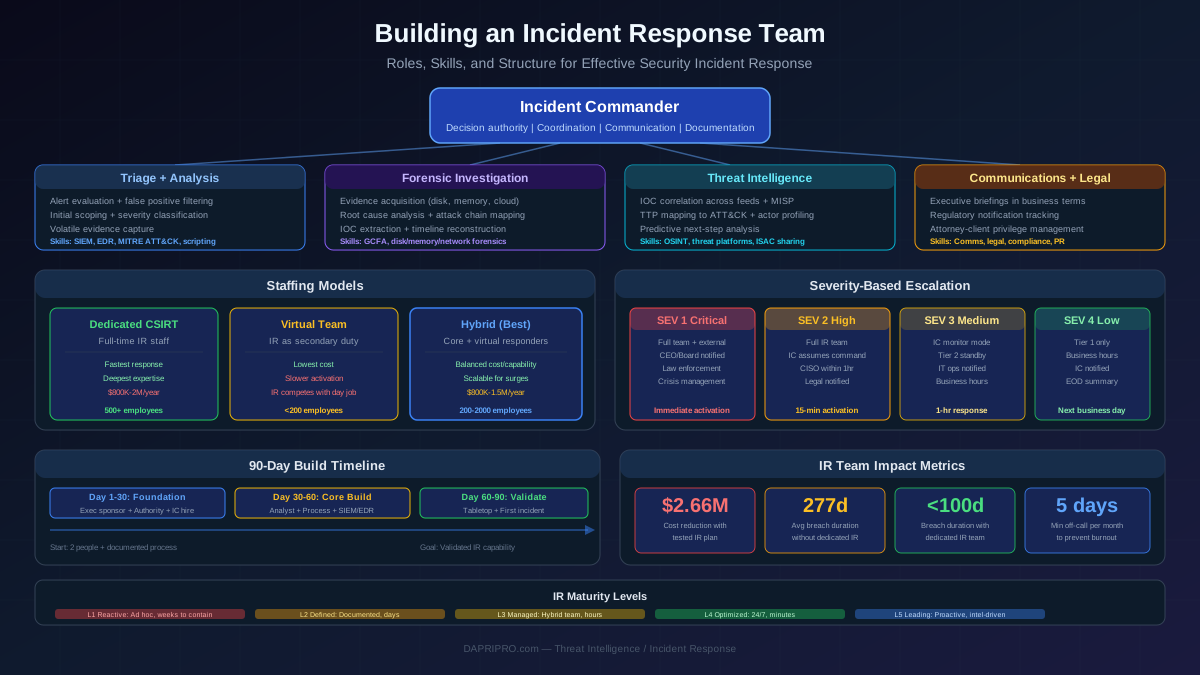

A security incident has been detected. The SOC confirms that an attacker has been inside your network. The business wants the affected systems restored immediately. Legal wants to know what data was accessed. The IR team needs to determine how the attacker got in and whether they are still present. Law enforcement may need evidence for prosecution. And every minute that passes, evidence is being lost.
This is where digital forensics and evidence preservation determine the outcome. Organizations that preserve evidence properly can answer the critical questions: what happened, when it happened, how it happened, what data was affected, and whether the attacker is gone. Organizations that skip evidence preservation in their rush to "fix" the problem will never answer those questions with certainty. They will reimage compromised systems, reopen for business, and hope the attacker does not return through the same entry point they never identified.
This guide covers practical digital forensics evidence preservation: what to collect, how to collect it, how to maintain its integrity, and how to ensure your evidence will be admissible if the incident leads to legal proceedings.
The Order of Volatility
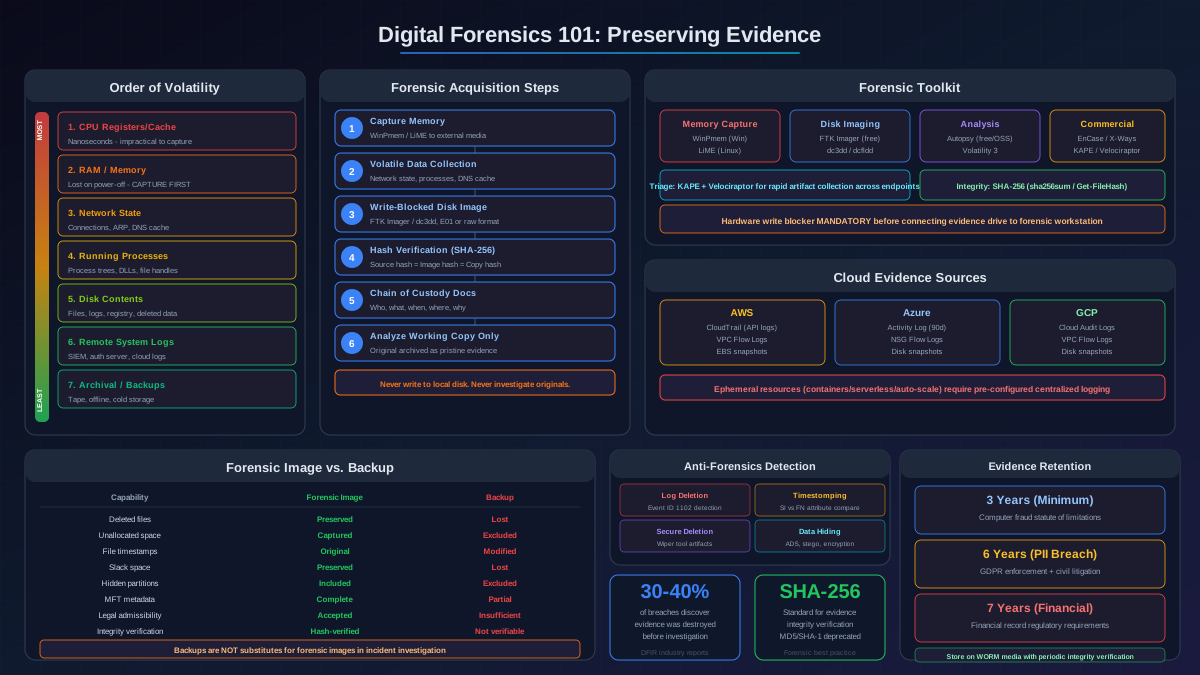
Digital evidence has a hierarchy of persistence. Some evidence disappears in nanoseconds. Other evidence persists for years. The order of volatility dictates what you collect first: always capture the most volatile evidence before it disappears.
Volatility Hierarchy (Most Volatile First)
1. CPU registers and cache — Exist for nanoseconds to microseconds. Cannot be practically captured during incident response. Their contents are reflected in memory analysis and are primarily relevant in advanced malware analysis scenarios.
2. Memory (RAM) — Contains running processes, network connections, encryption keys, loaded malware (including fileless malware that exists only in memory), clipboard contents, command history, and user session data. Lost permanently when the system is powered off or rebooted. Memory capture is the single most time-critical evidence collection action.
3. Network state — Active network connections, routing tables, ARP cache, DNS cache, and active sessions. Partially lost on reboot, partially overwritten by ongoing network activity. Capture immediately after memory.
4. Running processes — Process listings with parent-child relationships, loaded DLLs/shared libraries, open file handles, and command-line arguments. Reveals attacker tools, persistence mechanisms, and lateral movement activity. Lost on reboot.
5. Disk contents — File system data, log files, application data, registry hives (Windows), configuration files. Persist across reboots but can be modified by continued system operation. Ongoing write activity can overwrite deleted files in unallocated space, reducing recoverable evidence.
6. Log data on remote systems — SIEM data, centralized logs, network device logs, authentication server logs, cloud provider logs. Persist independently of the compromised system but may be subject to retention limits. Identify and preserve relevant remote logs before they age out of retention.
7. Archival and backup media — Tape backups, offline backups, archival storage. Most persistent evidence source. Useful for establishing pre-incident baseline and determining when compromise first occurred.
Evidence Acquisition Methods
Each evidence type requires specific acquisition techniques to ensure forensic soundness: completeness, accuracy, and verifiability.
Memory Acquisition
Memory capture must occur before any other action on the compromised system. Every action you take on a running system (including running forensic tools) modifies memory. The goal is to minimize the footprint of your collection activity.
Windows memory acquisition: WinPmem is the most widely used free tool. It runs as a kernel driver that reads physical memory directly. Execute WinPmem from a USB drive (not from the compromised system's disk) and write the memory dump to an external drive. Usage: run the WinPmem executable with the output path pointing to your external media. The resulting raw memory dump can be analyzed with Volatility 3 or Rekall.
Linux memory acquisition: LiME (Linux Memory Extractor) is a loadable kernel module that dumps physical memory. Compile LiME for the target system's exact kernel version (a module compiled for a different kernel version will not load). Load the module and specify the output path and format (raw or lime format). For systems where you cannot load a kernel module, /proc/mem provides an alternative, though it is less reliable for complete memory capture.
Virtual machine memory acquisition: For VMs running on hypervisors you control, suspend the VM and capture the memory file directly from the hypervisor. VMware creates .vmem files on suspend. Hyper-V creates .bin memory files. This approach is non-intrusive and captures memory without running any tools inside the guest OS.
Critical rule: Write memory dumps to external media, never to the compromised system's disk. Writing to the local disk overwrites unallocated space where deleted attacker files may reside.
Disk Imaging
Disk imaging creates a bit-for-bit copy of the entire storage device, including all partitions, unallocated space, deleted file remnants, and file system metadata. Unlike a file-level copy, a forensic image preserves evidence that exists in storage areas the operating system does not expose through normal file access.
Write blocking is mandatory. Before connecting the evidence drive to your forensic workstation, attach a hardware write blocker between the evidence drive and your workstation. A write blocker allows read operations but physically prevents any write operations from reaching the evidence drive. Without a write blocker, your operating system may automatically write to the evidence drive (updating access timestamps, mounting file systems, running antivirus scans), contaminating the evidence.
Imaging tools:
- FTK Imager (free) — GUI-based imaging tool for Windows. Creates E01 (EnCase format) or raw (dd) images with built-in hash verification. The most accessible tool for organizations starting forensic capabilities.
- dc3dd / dcfldd — Enhanced versions of the Unix dd command with built-in hashing, progress reporting, and error handling. Used extensively in Linux-based forensic environments.
- Guymager — GUI-based Linux imaging tool with multi-threaded compression and hash verification. Included in forensic Linux distributions like CAINE and PALADIN.
Imaging process:
- Document the source drive: make, model, serial number, capacity, interface type. Photograph the drive and its physical condition.
- Connect the source drive through a hardware write blocker.
- Calculate the source drive hash (SHA-256) before imaging begins. This is the reference hash that proves the source was not modified.
- Create the forensic image to your destination media. Use E01 format for compression and built-in metadata, or raw format for maximum compatibility.
- Calculate the hash of the completed image and verify it matches the source hash. A matching hash proves the image is a perfect copy.
- Create a second copy of the image for analysis (work copy). The original image is archived as evidence.
Chain of Custody
Chain of custody is the documented, unbroken record of who controlled evidence from the moment of collection to its presentation in legal proceedings. It answers the question: can you prove this evidence has not been tampered with since it was collected?
Documentation Requirements
Every evidence item requires a custody log that records:
- Collection details — Who collected it (full name, title, organization), when (date and time with timezone), where (physical location or network address), how (tools and methods used), and what (description of the evidence item including serial numbers, model numbers, and identifying characteristics).
- Hash values — SHA-256 hash of the evidence at time of collection. This cryptographic fingerprint proves the evidence has not been modified. SHA-256 is the current standard. MD5 and SHA-1 are deprecated for forensic use due to known collision vulnerabilities.
- Transfer records — Every time evidence changes hands, both the person releasing and the person receiving must sign with date and time. This includes transfers between team members, shipments to external forensic labs, and evidence admission to secure storage.
- Storage records — Where evidence is stored, what access controls protect it, and a log of every access to the storage location. Evidence should be stored in a locked, access-controlled location with a sign-in/sign-out log.
Digital Evidence Specific Considerations
Digital evidence has unique chain-of-custody challenges:
- Copying does not consume the original. Unlike physical evidence, digital evidence can be copied perfectly. This means both the original and copies need separate chain-of-custody documentation.
- Hash verification enables remote integrity checking. You can verify that a forensic image stored in a remote facility has not been modified by comparing its current hash against the hash recorded at collection time, without physical access to the media.
- Cloud evidence may not have a physical form. Cloud logs, API records, and virtual machine snapshots exist only as data in cloud provider infrastructure. Chain of custody for cloud evidence requires documenting the API calls used to retrieve it, the timestamps of retrieval, and hash values of the downloaded data.
Cloud Forensics Challenges
Cloud environments fundamentally change forensic evidence collection. You cannot walk into a data center and seize a cloud server. The shared responsibility model means some evidence is controlled by the cloud provider and some by the customer. Ephemeral resources may cease to exist by the time you begin collection.
Shared Responsibility and Evidence Access
In IaaS (AWS EC2, Azure VMs, GCP Compute Engine), you control the operating system, applications, and data, but the cloud provider controls the hypervisor, physical hardware, and network infrastructure. You can collect evidence from within your VMs (memory dumps, disk snapshots, OS logs), but you cannot collect hypervisor logs or physical disk images without the cloud provider's cooperation, which typically requires legal process.
In PaaS and SaaS environments, the customer has even less evidence access. You may be limited to API logs, authentication logs, and application-level data. The platform internals are entirely controlled by the provider.
Cloud-Native Evidence Sources
AWS: CloudTrail (API activity logging), VPC Flow Logs (network traffic metadata), GuardDuty findings, S3 access logs, EBS snapshots (disk state capture), and EC2 instance metadata. CloudTrail is the most critical evidence source in AWS because it records every API call, including the identity of the caller, the time, the source IP, and the request parameters.
Azure: Azure Activity Log, Azure Monitor logs, NSG Flow Logs, Microsoft Defender for Cloud alerts, Azure Storage analytics, and managed disk snapshots. Azure Activity Log provides 90 days of control plane activity by default.
GCP: Cloud Audit Logs (Admin Activity and Data Access), VPC Flow Logs, Cloud Logging, Security Command Center findings, and persistent disk snapshots.
Ephemeral Resources
Containers, serverless functions, and auto-scaling instances may exist for seconds to hours. When these resources terminate, their local state is lost. Forensic readiness for ephemeral environments requires pre-incident preparation:
- Route all container logs to a centralized, persistent log store before incidents occur.
- Enable cloud provider audit logging at the maximum detail level and send logs to a separate, locked-down storage account that attackers cannot modify even if they compromise the production environment.
- Configure serverless function logging to capture invocation parameters, execution logs, and error details.
- Implement container runtime security that captures filesystem changes, network connections, and process execution within containers before they are terminated.
Anti-Forensics Detection
Sophisticated attackers deliberately destroy, modify, or obfuscate evidence to hinder forensic investigation. Understanding anti-forensics techniques helps investigators recognize when evidence has been tampered with and adjust their analysis approach.
Common Anti-Forensics Techniques
Log deletion and manipulation: Attackers clear Windows Event Logs (using wevtutil or Clear-EventLog), delete Linux auth/syslog files, or modify individual log entries to remove evidence of their activity. Detection: look for gaps in log sequences (missing event IDs), log files with modification timestamps that do not match their content, and Event Log clearing events (Windows Event ID 1102).
Timestamp manipulation (timestomping): Attackers modify file creation, modification, and access timestamps to make their tools appear to be legitimate system files that have existed for months or years. Detection: compare NTFS MFT timestamps ($STANDARD_INFORMATION vs. $FILE_NAME attributes), as timestomping tools typically modify only the $STANDARD_INFORMATION timestamps. Also compare file timestamps against corresponding journal entries (USN Journal, $LogFile).
File wiping and secure deletion: Attackers use tools like SDelete, BleachBit, or custom scripts to overwrite file contents before deletion, preventing recovery from unallocated space. Detection: look for artifacts of wiping tools (registry entries, prefetch files, event logs showing tool execution), and note that wiping tools themselves leave forensic artifacts of their use.
Data hiding: Attackers hide data in alternate data streams (NTFS ADS), steganography (data embedded in image files), encrypted containers, or slack space. Detection: scan for alternate data streams on NTFS volumes, analyze image files for steganographic signatures, and examine disk slack space for structured data patterns.
Legal Admissibility
For evidence to be admissible in legal proceedings (criminal prosecution, civil litigation, regulatory enforcement), it must meet several requirements that go beyond simply collecting data.
Daubert Standard Requirements
In US federal courts and most state courts, expert testimony and scientific evidence must satisfy the Daubert standard:
- Testability — The forensic methodology used can be tested and validated. Using established tools (EnCase, FTK, Autopsy) with documented procedures satisfies this requirement because these tools have been validated through extensive use and legal precedent.
- Peer review — The methodology has been subject to peer review and publication. Standard forensic procedures (disk imaging, memory analysis, log review) are extensively documented in forensic literature and used by forensic professionals worldwide.
- Known error rate — The methodology has a known potential error rate. Forensic tools report their error rate (bit-for-bit accuracy verified through hashing). Chain of custody documentation demonstrates that error introduction through evidence handling is controlled.
- General acceptance — The methodology is generally accepted in the relevant scientific community. Standard digital forensic procedures are accepted by the digital forensics community, law enforcement, and courts worldwide.
Practical Admissibility Checklist
For each evidence item, ensure you can demonstrate:
- The evidence is authentic: it is what it purports to be (proven through chain of custody and hash verification).
- The evidence is complete: nothing has been selectively included or excluded (proven through bit-for-bit imaging rather than selective file copying).
- The evidence has not been modified: its integrity is intact from collection to presentation (proven through continuous hash verification).
- The collection methodology is reliable: the tools and procedures used are accepted and validated (proven through use of standard forensic tools and documented procedures).
- The analyst is qualified: the person who collected and analyzed the evidence has appropriate training and experience (proven through qualifications, certifications, and testimony).
Building Forensic Readiness
Forensic readiness means configuring your environment before incidents to maximize evidence availability and minimize collection effort during an active incident.
Pre-Incident Preparation
Centralized logging: Send logs from all critical systems to a centralized, tamper-resistant log store (SIEM or dedicated log archive). Configure retention periods that exceed your expected investigation timeline (minimum 90 days, preferably 1 year). Ensure the log store is in a separate security domain from production systems so that an attacker who compromises production cannot delete the centralized logs.
Audit policy configuration: Enable comprehensive auditing on critical systems. On Windows: enable advanced audit policies for logon events, process creation (with command-line logging), object access, privilege use, and account management. On Linux: configure auditd for syscall auditing, file access monitoring, and authentication events. In cloud environments: enable all available audit log categories at the maximum detail level.
Forensic toolkit preparation: Maintain a forensic jump kit with acquisition tools, external storage media, write blockers, chain of custody forms, and network cables. Store the kit in a known location accessible to the IR team. Validate tools quarterly to ensure they work on current operating system versions.
Evidence handling procedures: Document evidence collection procedures, chain of custody requirements, and storage locations before you need them. During an active incident, responders should follow documented procedures rather than making ad hoc decisions about evidence handling under pressure.
The most important thing about digital forensics is that it enables informed decisions. You cannot determine the scope of a breach, meet regulatory notification requirements, or prevent recurrence if you do not understand what happened. Evidence preservation makes that understanding possible. Every shortcut in evidence handling, every system reimaged without forensic capture, every log that was not preserved, is information you will never recover. Protect the evidence first. You can always analyze it later, but you cannot analyze evidence that no longer exists.