
Rootkits are the ultimate stealth malware. While ransomware announces itself with ransom notes and infostealers race to exfiltrate before detection, rootkits take the opposite approach: they modify the operating system itself to become invisible, allowing threat actors to maintain persistent access for months or years without triggering a single alert.
This makes rootkit detection fundamentally different from detecting other malware families. You cannot rely on file scans, process lists, or network monitors that operate within the OS, because the rootkit controls what those tools see. Detection requires looking at the system from a perspective the rootkit cannot control: raw memory analysis, hardware-level attestation, or cross-view comparisons that reveal discrepancies between what the OS reports and what actually exists on disk.
Rootkit Taxonomy: Five Privilege Levels
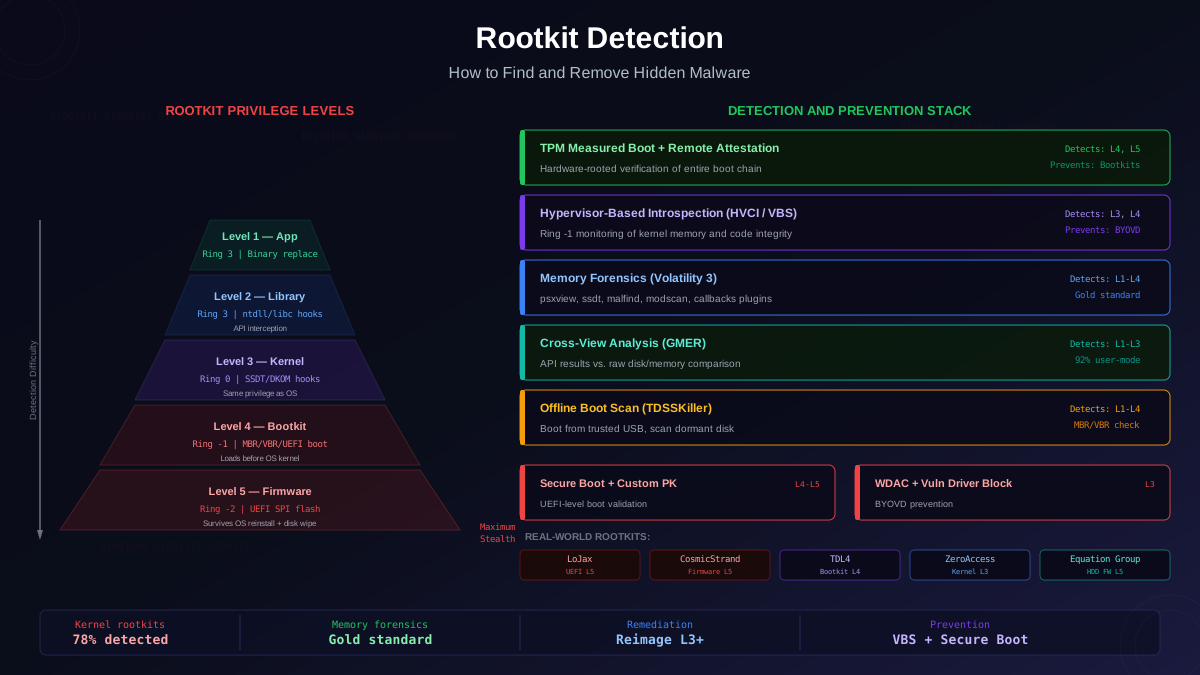
Rootkits are categorised by the privilege level at which they operate, which directly determines their stealth capabilities and the detection methods required to find them.
Level 1 — Application-Layer Rootkits
The simplest rootkits operate in user space, replacing or patching legitimate system utilities. A classic example replaces ls, ps, and netstat on Linux with modified versions that filter out malicious entries. On Windows, application-layer rootkits typically use DLL injection to hook API calls within specific processes. These are the easiest to detect because they do not modify kernel structures.
Level 2 — Library-Level Rootkits
These rootkits intercept calls at the shared-library level, patching libc.so on Linux or hooking ntdll.dll on Windows. By modifying the libraries that applications use to interact with the operating system, they can hide files, processes, and network connections from any application that uses standard API calls. Detection requires comparing library files against known-good hashes or using direct system calls that bypass the hooked library.
Level 3 — Kernel-Mode Rootkits
Kernel rootkits load as device drivers or kernel modules and operate with Ring 0 privileges. They can hook the System Service Descriptor Table (SSDT), modify interrupt handlers, or use Direct Kernel Object Manipulation (DKOM) to alter kernel data structures directly. Because they run at the same privilege level as the operating system itself, they can hide from any detection tool that relies on kernel APIs. Windows kernel rootkits typically install as unsigned drivers; Kernel-Mode Code Signing (KMCS) enforcement and Secure Boot significantly raise the bar for this class.
Level 4 — Bootkits
Bootkits infect the Master Boot Record (MBR), Volume Boot Record (VBR), or UEFI boot components, loading before the operating system kernel. This gives them control over the entire boot chain: they can patch the kernel as it loads into memory, disable security features, and inject rootkit drivers before any security software initialises. Notable examples include TDL4, Rovnix, and the UEFI bootkit ESPecter.
Level 5 — Firmware/Hardware Rootkits
The most persistent rootkits live in firmware: UEFI SPI flash, hard-drive firmware, network-card firmware, or even GPU firmware. These survive OS reinstallation, disk reformatting, and in some cases hardware replacement. The Equation Group's HDD firmware implants (disclosed by Kaspersky in 2015) and the LoJax UEFI rootkit (attributed to APT28) demonstrated that this class is not theoretical — it is actively deployed by nation-state actors.
How Rootkits Achieve Invisibility
Understanding the specific hiding techniques is essential for building detection strategies. Each technique has corresponding detection methods.
System Service Descriptor Table (SSDT) Hooking
The SSDT is a kernel table that maps system call numbers to their implementation functions. When a user-mode application calls NtQuerySystemInformation (which underlies tasklist.exe and Task Manager), the kernel looks up the function pointer in the SSDT. A rootkit replaces this pointer with the address of its own function, which calls the original, filters out entries for malicious processes, and returns the sanitised result.
Detection approach: dump the SSDT and compare every function pointer against the known address range of ntoskrnl.exe. Any pointer that falls outside this range indicates a hook. The Volatility ssdt plugin automates this comparison.
Direct Kernel Object Manipulation (DKOM)
Rather than hooking function calls, DKOM rootkits modify kernel data structures directly. The most common technique targets the EPROCESS structure, which represents a running process in the Windows kernel. Every process is linked in a doubly-linked list via the ActiveProcessLinks field. A rootkit unlinking a process from this list makes it invisible to any tool that enumerates processes using the standard API chain (NtQuerySystemInformation to PsActiveProcessHead), while the process continues to execute normally because the scheduler uses a different data structure (the dispatcher ready list).
Detection approach: enumerate processes through multiple independent methods and compare results. The Volatility psxview plugin checks seven different process-enumeration techniques (PsActiveProcessHead, thread scanning, CSRSS handle table, PspCid table, session list, desktop threads, pspcid). A process visible in some views but not others is a strong rootkit indicator.
Inline Function Patching (Detours)
Instead of modifying the SSDT, some rootkits patch the first few bytes of target kernel functions with a JMP instruction to their hook function. This is harder to detect via table scanning because the SSDT still contains the correct addresses — the hook is at the function level. The hook function performs the filtering and then jumps back past the patched bytes to execute the original function.
Detection approach: scan the first bytes of critical kernel functions for JMP or CALL instructions that redirect to addresses outside the expected module range. Integrity-checking tools that compare loaded kernel code against the on-disk binary detect these patches.
IRP Hook and Filter Driver Stacking
Windows uses I/O Request Packets (IRPs) to communicate between drivers. A rootkit can register as a filter driver in the device stack for the file system, intercepting every file-open, file-read, and directory-enumeration request. By filtering IRP responses, the rootkit hides files and directories without hooking the SSDT or patching functions. This technique is used by TDL3 and the ZeroAccess rootkit family.
Detection approach: enumerate the device stack for each file-system volume and check for unexpected filter drivers. Compare the driver list against a known-good baseline. Tools like DeviceTree and WinObj expose the driver stack for manual inspection.
Boot-Process Manipulation
Bootkits modify the Master Boot Record or UEFI boot components to load malicious code before the operating system. The rootkit driver is injected into memory during the boot process, before Kernel-Mode Code Signing enforcement is active. This means the rootkit can load unsigned kernel drivers regardless of Secure Boot settings — unless Secure Boot is properly configured with a custom Platform Key that rejects the attacker's bootloader.
Detection approach: compare the MBR/VBR against known-good copies using a tool booted from trusted media. For UEFI systems, verify the boot chain against expected measurements stored in the TPM using remote attestation. Microsoft's Measured Boot and Windows Boot Integrity features provide remote verification of the boot chain.
Detection Tools and Techniques
Effective rootkit detection requires tools that operate outside the rootkit's sphere of control. The hierarchy of trust goes: trust the hardware more than the firmware, the firmware more than the bootloader, and the bootloader more than the OS.
Memory Forensics with Volatility 3
Volatility is the most comprehensive memory-forensics framework for rootkit detection. It analyses a physical memory dump (acquired via tools like WinPMEM, LiME, or through hypervisor introspection) and reconstructs kernel data structures independently of the potentially compromised OS.
Key Volatility plugins for rootkit hunting:
- psxview — cross-references seven process-enumeration methods to find hidden processes
- ssdt — dumps the SSDT and flags hooked entries pointing outside ntoskrnl.exe
- malfind — scans process memory for regions with executable permissions and no backing file, indicating injected code
- driverirp — lists IRP major function handlers for all drivers and flags those pointing outside the driver's own module
- modscan — scans for loaded and unloaded kernel modules, catching rootkits that unlink themselves from the module list
- callbacks — lists registered kernel notification routines that rootkits use for persistence
A practical hunting workflow: acquire memory with WinPMEM, run psxview to check for hidden processes, ssdt to check for hooked system calls, modscan to find unlisted kernel modules, and malfind to find injected code in running processes. Any discrepancy is a rootkit indicator worth investigating.
GMER
GMER is a free Windows anti-rootkit tool that performs live cross-view analysis. It compares the results of standard API calls against raw disk and memory reads, highlighting discrepancies. GMER checks for hidden processes, hidden services, hidden files, SSDT hooks, IDT hooks, IRP hooks, and inline hooks. While it runs within the potentially compromised OS (limiting its effectiveness against sophisticated kernel rootkits), it reliably detects the majority of user-mode and many kernel-mode rootkits.
Kaspersky TDSSKiller
Originally developed to combat the TDL rootkit family, TDSSKiller performs specialised scans for bootkits and kernel-mode rootkits. It checks the MBR, boot sectors, loaded drivers, and critical system files. It can also detect and remove rootkits from the MBR/VBR, making it one of the few tools that handles bootkit remediation.
chkrootkit and rkhunter (Linux)
For Linux systems, chkrootkit and rkhunter check for known rootkit signatures, suspicious files, and modified system binaries. They compare system binaries against known-good hashes, check for hidden processes and network connections, and scan for known rootkit files and directories. While they primarily detect known rootkit families, they are essential baseline tools for Linux server security.
Hardware-Based Detection
The most tamper-resistant detection uses hardware features that rootkits cannot manipulate:
- TPM-based measured boot — the TPM records cryptographic measurements of every component in the boot chain. Remote attestation verifies these measurements against expected values. Any bootkit or firmware rootkit changes the measurements, triggering an alert.
- Hypervisor-based introspection — a thin hypervisor beneath the OS can monitor kernel memory from a higher privilege level (Ring -1), detecting modifications that kernel-mode rootkits cannot hide from. Solutions like Bitdefender HVI and Xen-based introspection use this approach.
- Intel TXT/AMD SEV — hardware trust-establishment technologies that verify the boot environment before the OS loads. Combined with remote attestation, they provide hardware-rooted proof that the system booted into a clean state.
Practical Detection Walkthrough
Here is a step-by-step process for hunting rootkits on a suspect Windows system.
Step 1 — Acquire Memory from a Trusted Context
Do not acquire memory using tools running within the suspect OS if a kernel-mode rootkit is suspected. Use WinPMEM deployed via PXE boot, or acquire memory through a hypervisor if the system is virtualised. For physical machines, DMA-based acquisition via Firewire/Thunderbolt (using tools like Inception or PCILeech) bypasses the OS entirely.
# WinPMEM memory acquisition
winpmem_mini_x64.exe --output memory.raw --format raw

# Verify acquisition integrity
sha256sum memory.raw > memory.raw.sha256
Step 2 — Process Cross-Referencing
Run the Volatility psxview equivalent (or windows.pslist and windows.psscan in Volatility 3) to compare process enumeration methods:
# Volatility 3: List processes from EPROCESS linked list
vol -f memory.raw windows.pslist

# Scan memory for EPROCESS structures (finds unlinked processes)
vol -f memory.raw windows.psscan

# Compare results to find discrepancies
# Processes in psscan but not pslist indicate DKOM hiding
A process that appears in psscan (which scans raw memory for EPROCESS pool tags) but not in pslist (which follows the ActiveProcessLinks linked list) is a strong indicator of DKOM-based process hiding.
Step 3 — System Call Table Verification
# Check SSDT for hooked entries
vol -f memory.raw windows.ssdt

# Look for entries pointing outside ntoskrnl.exe
# Normal: all handlers within nt!* or win32k!*
# Suspicious: handler pointing to 0xFFFFF880XXXXXXXX (unknown driver range)
Step 4 — Driver and Module Analysis
# List loaded drivers from the module list
vol -f memory.raw windows.modules

# Scan for module structures in memory (finds unlinked modules)
vol -f memory.raw windows.modscan

# Check driver IRP handlers for hooks
vol -f memory.raw windows.driverirp
A driver present in modscan but missing from the module list has been unlisted — a classic rootkit behaviour. Additionally, IRP handlers pointing outside their driver's memory range indicate filter-driver rootkit activity.
Step 5 — Injected Code Detection
# Find injected executable regions
vol -f memory.raw windows.malfind

# Dump suspicious regions for further analysis
vol -f memory.raw windows.malfind --dump-dir ./dumps/
The malfind plugin identifies process memory regions that are executable but have no corresponding file on disk. While some legitimate software uses executable non-image memory (JIT compilers, packers), in the context of rootkit hunting, these regions should be dumped and scanned with YARA rules.
Step 6 — Boot Sector Verification
Boot from trusted media and compare the MBR/VBR against known-good copies:
# Linux live boot: read MBR
dd if=/dev/sda bs=512 count=1 of=current_mbr.bin

# Compare against known-good backup
diff current_mbr.bin known_good_mbr.bin

# For UEFI: check ESP contents
mount /dev/sda1 /mnt/esp
sha256sum /mnt/esp/EFI/Microsoft/Boot/bootmgfw.efi
# Compare against hash from Microsoft's signed distribution
Prevention: Hardening Against Rootkit Installation
Prevention is far more practical than detection for rootkits. Once a kernel-mode rootkit is installed, the only fully reliable remediation is reimaging the system. These preventive controls make rootkit installation significantly harder.
Secure Boot and UEFI Configuration
- Enable Secure Boot with a custom Platform Key (PK) — the default Microsoft PK has been compromised in multiple key leaks
- Enable Measured Boot with TPM 2.0 to record boot-chain measurements
- Disable legacy boot (CSM) to prevent MBR-based bootkits
- Password-protect UEFI settings to prevent attackers from disabling Secure Boot
- Enable UEFI Secure Boot revocation lists (dbx) and keep them updated
Kernel-Mode Code Signing Enforcement
Windows KMCS enforcement (mandatory on 64-bit systems since Vista) prevents loading unsigned kernel drivers. However, attackers bypass this using:
- Signed-but-vulnerable drivers (BYOVD — Bring Your Own Vulnerable Driver) that allow kernel read/write primitives
- Exploiting vulnerable Microsoft-signed drivers like
dbutil_2_3.sys(Dell),gdrv.sys(Gigabyte), orene.sys(various OEMs) - Test-signing mode abuse on misconfigured development machines
Defend against BYOVD by maintaining a vulnerable-driver blocklist. Microsoft publishes one via Windows Update, and the community maintains additional lists. Deploy the blocklist via WDAC (Windows Defender Application Control) driver rules.
Virtualisation-Based Security (VBS)
VBS on Windows 10/11 uses the hypervisor to create an isolated kernel-mode environment that even Ring 0 code cannot access. Key VBS features for rootkit prevention:
- Hypervisor-Protected Code Integrity (HVCI) — prevents loading unsigned kernel code even if an attacker has kernel write access
- Credential Guard — isolates LSASS secrets in a virtualisation-protected enclave, preventing rootkits from dumping credentials
- Kernel DMA Protection — prevents DMA-based firmware attacks through IOMMU enforcement
Enable VBS and HVCI on all endpoints. This raises the rootkit installation bar from "get kernel code execution" to "compromise the hypervisor", which is significantly harder.
Linux Kernel Lockdown
Linux 5.4+ includes a kernel lockdown mode that restricts kernel modifications even for root:
- Prevents direct access to
/dev/memand/dev/kmem - Blocks writing to kernel memory via
/proc/kcore - Disables unsigned kernel module loading
- Prevents hibernation image exploitation
- Restricts access to eBPF, which could be used for hooking
Real-World Rootkit Campaigns
LoJax (APT28 / Fancy Bear)
Discovered by ESET in 2018, LoJax was the first UEFI rootkit found in the wild. It modified the SPI flash memory containing the UEFI firmware, ensuring persistence across OS reinstalls and disk replacements. LoJax was based on a modified version of the legitimate LoJack anti-theft software, which already had UEFI persistence capabilities. Detection required dumping and analysing the SPI flash contents.
TDL4 / TDSS
TDL4 was a sophisticated bootkit that infected the MBR and used DKOM to hide its processes. At its peak in 2011, it infected an estimated 4.5 million systems. TDL4 used an encrypted virtual file system stored in unallocated disk space and could survive OS reinstallation. It demonstrated that bootkit technology was viable for mass-market malware, not just targeted attacks.
ZeroAccess
ZeroAccess combined kernel-mode rootkit techniques (IRP hooking, DKOM) with a peer-to-peer botnet infrastructure. At its peak, the botnet comprised over 9 million systems and was primarily used for click fraud and Bitcoin mining. The rootkit component hid the malware files and processes while generating a hidden encrypted volume for its payload storage.
CosmicStrand (2022)
Kaspersky documented CosmicStrand, a UEFI firmware rootkit targeting specific ASUS and Gigabyte motherboards. The implant modified the UEFI firmware to inject malicious code into the Windows kernel during boot, establishing a persistent backdoor. The rootkit survived firmware updates performed through the standard OEM update tools, requiring manual SPI flash reprogramming for removal.
Incident Response: Rootkit Confirmed
When rootkit indicators are confirmed through memory forensics or cross-view analysis, the response differs significantly from standard malware incidents.
User-Mode Rootkits (Level 1-2)
- Boot from trusted media (USB or PXE)
- Mount the suspect drive read-only
- Scan with offline AV and anti-rootkit tools
- Replace compromised binaries and libraries with known-good copies
- Verify system integrity using tripwire-style hash databases
- Monitor closely for re-infection — user-mode rootkits often indicate a deeper compromise
Kernel-Mode Rootkits (Level 3)
- Do not attempt in-place remediation — the rootkit controls the environment
- Acquire a full forensic image (disk and memory) for analysis
- Reimage the system from a trusted golden image
- Apply all security updates before reconnecting to the network
- Enable VBS/HVCI and Secure Boot to prevent reinstallation
- Investigate how the rootkit was installed — kernel rootkits require admin access or a kernel exploit, implying a prior compromise
Bootkits and Firmware Rootkits (Level 4-5)
- Remove the system from the network immediately
- Acquire forensic images of the disk, memory, and if possible the SPI flash
- For bootkits: rewrite the MBR/GPT from a known-clean source, then reinstall the OS
- For UEFI rootkits: contact the hardware vendor for firmware reflashing procedures. Standard firmware updates may not overwrite the rootkit.
- In some cases, hardware replacement is the only reliable remediation for firmware-level implants
- Report to your national CERT — firmware rootkits typically indicate nation-state activity and may affect other systems of the same model
Building Organisational Rootkit Detection Capability
Most organisations lack dedicated rootkit-detection capability. Here is a pragmatic maturity model:
Level 1 — Baseline Prevention
Enable Secure Boot, HVCI, and KMCS on all endpoints. Deploy a vulnerable-driver blocklist. These controls prevent the majority of known rootkit installation techniques with minimal operational overhead.
Level 2 — Periodic Scanning
Run anti-rootkit tools (GMER, TDSSKiller, rkhunter) quarterly on a sample of endpoints. Check boot-sector integrity against known-good baselines. This catches rootkits that evade EDR but are detectable by specialised tools.
Level 3 — Memory Forensics Capability
Build an internal memory-forensics lab with Volatility 3 and Rekall. Train analysts on acquiring and analysing memory dumps. Conduct memory-forensics analysis during incident response and periodically on high-value targets (domain controllers, jump servers).
Level 4 — Continuous Monitoring
Deploy hypervisor-based introspection on critical servers. Implement TPM-based remote attestation that verifies boot integrity at every startup. Integrate kernel-integrity monitoring into your EDR platform. At this level, rootkit installation attempts trigger real-time alerts.
For most organisations, reaching Level 2 is a realistic near-term goal. Level 3 should be the target for any organisation with a dedicated security operations team. Level 4 is appropriate for organisations defending high-value assets against nation-state threats.