
Imagine your laptop is a house. Right now, it probably has windows wide open, the back door unlocked, and a spare key under the mat. That is what an unhardened endpoint looks like to a hacker. Endpoint hardening closes those windows, bolts those doors, and removes the spare key.
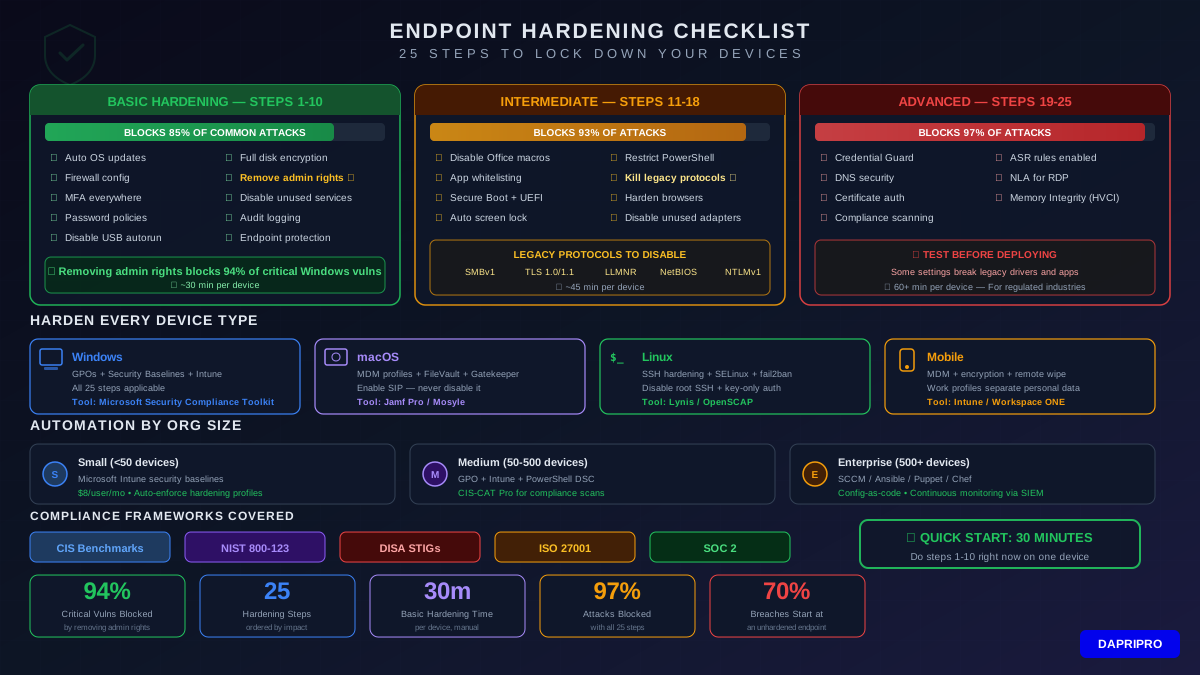
This checklist gives you 25 specific steps to lock down Windows, macOS, and Linux devices. Each step includes the exact settings, commands, or tools you need. We have organized them by priority — the first 10 steps block about 85% of common attacks.
What Is Endpoint Hardening?
Endpoint hardening means reducing the attack surface of a device. Every computer ships with features turned on, ports open, and default settings that make life easier — for both you and hackers. Hardening strips away everything your device does not actually need.
Here is a real example. A default Windows 11 install has about 240 running services. Most businesses use roughly 80 of them. The other 160 are doors an attacker could walk through. Hardening closes those 160 doors.
| Hardening Level | Attack Surface Reduction | Time to Apply | Best For |
|---|---|---|---|
| Basic (Steps 1-10) | ~85% of common attacks blocked | 30 minutes per device | Every business |
| Intermediate (Steps 11-18) | ~93% of attacks blocked | 45 minutes per device | Businesses handling sensitive data |
| Advanced (Steps 19-25) | ~97% of attacks blocked | 60+ minutes per device | Finance, healthcare, government |
Basic Hardening: Steps 1-10
These steps deliver the biggest security improvement for the least effort. If you only do 10 things, do these.
Step 1: Enable Automatic OS Updates
Unpatched systems are the number one way attackers break in. Microsoft releases patches on the second Tuesday of every month (Patch Tuesday). Apple and Linux distributions release updates on varying schedules. Turn on automatic updates on every device.
Windows: Settings → Windows Update → Turn on "Get the latest updates as soon as they're available"
macOS: System Settings → General → Software Update → Turn on automatic updates
Linux: Configure unattended-upgrades (Debian/Ubuntu) or dnf-automatic (RHEL/Fedora)
Step 2: Enable Full Disk Encryption
If someone steals a laptop, disk encryption keeps your data locked. Without it, anyone can pull the hard drive and read everything.
Windows: Enable BitLocker (Pro/Enterprise) or Device Encryption (Home). Store recovery keys in Azure AD or a secure vault.
macOS: Enable FileVault in System Settings → Privacy & Security.
Linux: Use LUKS encryption during installation.
Step 3: Configure the Local Firewall
Every operating system includes a built-in firewall. The problem? Default rules are often too permissive. Tighten them.
Windows Firewall rules to set:
- Block all inbound connections by default
- Allow only specific applications that need inbound access
- Enable logging for blocked connections (helps spot attacks)
- Create separate profiles for Domain, Private, and Public networks
Step 4: Remove Admin Rights from Daily Users
This is the single most impactful step. When users run as local admins, malware can install itself freely. Remove admin rights and force elevation prompts.
Impact: Microsoft reports that removing admin rights mitigates 94% of critical Windows vulnerabilities. That is not a typo. Ninety-four percent.
How to do it: Create a separate admin account for IT tasks. Set daily user accounts as Standard Users. Use tools like LAPS (Local Administrator Password Solution) for emergency admin access.
Step 5: Enable Multi-Factor Authentication Everywhere
Passwords alone are not enough. Enable MFA on every system that supports it — especially email, VPN, and cloud services. Hardware security keys (like YubiKey) provide the strongest protection, but authenticator apps work well too.
Step 6: Disable Unnecessary Services
Every running service is a potential attack vector. Disable services your business does not use.
Common services to disable on Windows workstations:
- Remote Desktop (RDP) — Top ransomware entry point. Disable unless absolutely needed, and if needed, restrict to specific IPs
- Remote Registry — Lets attackers read your registry remotely
- Windows Remote Management (WinRM) — Used in lateral movement attacks
- Server service (LanmanServer) — Not needed on workstations
- SNMP Service — Old protocol with known vulnerabilities
Step 7: Configure Password Policies
Set these minimum requirements through Group Policy or your identity provider:
| Setting | Recommended Value | Why |
|---|---|---|
| Minimum length | 14 characters | Longer passwords resist brute-force attacks |
| Account lockout | 5 failed attempts, 30 min lockout | Stops automated password guessing |
| Password history | Remember 24 passwords | Prevents password reuse |
| Complexity | Require 3 of 4 character types | Increases entropy |
| Expiration | No forced expiry (NIST guidance) | Forced changes lead to weaker passwords |
Step 8: Enable Audit Logging
You cannot detect attacks on devices that do not keep logs. Enable these Windows audit policies at minimum:
- Account Logon Events (success + failure)
- Logon Events (success + failure)
- Object Access (failure)
- Policy Change (success)
- Privilege Use (failure)
- Process Creation (success) — with command-line logging enabled
Forward logs to a SIEM or central log server. Local logs get deleted by attackers first thing.
Step 9: Disable USB Autorun and Autoplay
USB drives are a classic malware delivery method. The 2010 Stuxnet attack used USB autorun to spread. Disable both Autorun and AutoPlay via Group Policy to prevent malware from executing when someone plugs in a USB drive.
Step 10: Install and Configure Endpoint Protection
Every device needs antivirus/anti-malware protection. Windows Defender is actually quite capable in 2026 and scores well in independent tests. Whatever you choose, make sure:
- Real-time protection is enabled
- Cloud-delivered protection is turned on
- Automatic sample submission is enabled
- Scan schedules run at least daily
- Tamper protection prevents malware from disabling the AV
Intermediate Hardening: Steps 11-18
These steps require a bit more planning but add significant protection, especially against targeted attacks and ransomware.
Step 11: Disable Office Macros by Default
Malicious macros are the top malware delivery method in business email attacks. Block macros from running in files downloaded from the internet. In Group Policy: User Config → Administrative Templates → Microsoft Office → Security → "Block macros from running in Office files from the Internet" → Enabled.
Step 12: Restrict PowerShell Execution
Attackers love PowerShell because it is already installed on every Windows machine. Lock it down:
- Set execution policy to
AllSigned(only signed scripts run) - Enable PowerShell Script Block Logging
- Enable PowerShell Transcription
- Use Constrained Language Mode for non-admin users
- Consider removing PowerShell 2.0 (it bypasses modern security features)
Step 13: Implement Application Whitelisting
Instead of trying to block every bad program, only allow known good programs to run. This flips the security model from blocklist to allowlist.
Windows: Use AppLocker (Enterprise) or Windows Defender Application Control (WDAC). Start with audit mode to see what would be blocked before enforcing.
macOS: Use built-in Gatekeeper plus a third-party solution like Santa (by Google).
Step 14: Disable Legacy Protocols
Old protocols have known vulnerabilities that attackers actively exploit. Disable these unless you have a specific, documented business need:
| Protocol | Risk | How to Disable |
|---|---|---|
| SMBv1 | WannaCry, EternalBlue exploits | Disable-WindowsOptionalFeature -Online -FeatureName SMB1Protocol |
| TLS 1.0/1.1 | POODLE, BEAST attacks | Registry: HKLM\SYSTEM\CurrentControlSet\Control\SecurityProviders\SCHANNEL |
| LLMNR | Man-in-the-middle credential theft | Group Policy: Turn Off Multicast Name Resolution → Enabled |
| NetBIOS over TCP | Name poisoning, info disclosure | Network adapter → IPv4 → Advanced → WINS → Disable NetBIOS |
| NTLM v1 | Credential relay attacks | Group Policy: LAN Manager authentication level → NTLMv2 only |
Step 15: Configure Secure Boot and UEFI Settings
Secure Boot ensures only trusted software loads during startup. Bootkits and rootkits target the boot process because traditional antivirus cannot scan it. Make sure:
- Secure Boot is enabled in BIOS/UEFI
- BIOS/UEFI is password-protected
- Boot from USB/CD is disabled (or password-locked)
- TPM 2.0 is enabled and active
Step 16: Harden Web Browsers
Browsers are the second biggest attack surface after email. Harden them across all endpoints:
- Enable Safe Browsing / SmartScreen
- Block third-party cookies
- Disable JavaScript JIT compilation (if performance allows)
- Force HTTPS-only mode
- Manage extensions centrally — block all except approved ones
- Enable site isolation
Step 17: Set Up Automatic Screen Lock
Lock screens after 5 minutes of inactivity (or less for high-security environments). Require a password to unlock. This prevents unauthorized physical access when employees step away from their desks.
Step 18: Disable Unused Network Adapters
If a device does not need Bluetooth, disable it. Same for Wi-Fi on desktops that use Ethernet. Each enabled adapter is a potential attack vector. Disable them through Device Manager or Group Policy.
Advanced Hardening: Steps 19-25
These steps require more technical expertise and may impact usability. They are essential for organizations handling sensitive data or operating in regulated industries.
Step 19: Implement Credential Guard
Windows Credential Guard uses virtualization-based security to isolate credentials in a protected container. Even if an attacker gains admin access, they cannot dump password hashes from memory. This stops popular attacks like Pass-the-Hash and Mimikatz.
Requirements: Windows 10/11 Enterprise or Education, UEFI Secure Boot, TPM 2.0, 64-bit CPU with virtualization extensions.
Step 20: Enable Attack Surface Reduction (ASR) Rules
Microsoft Defender includes ASR rules that block specific attack techniques. Enable these critical rules:
- Block executable content from email client and webmail
- Block all Office applications from creating child processes
- Block JavaScript or VBScript from launching downloaded content
- Block process creations originating from PSExec and WMI commands
- Block credential stealing from the Windows local security authority subsystem (lsass.exe)
- Block untrusted and unsigned processes that run from USB
Step 21: Configure DNS Security
Switch to a secure DNS resolver that blocks known malicious domains. Options include:
- Quad9 (9.9.9.9) — Blocks malware domains, free, privacy-focused
- Cloudflare for Families (1.1.1.3) — Blocks malware + adult content
- Cisco Umbrella — Enterprise DNS security with logging and analytics
Also enable DNS over HTTPS (DoH) or DNS over TLS (DoT) to prevent DNS snooping and tampering.
Step 22: Implement Network-Level Authentication (NLA)
If you must use Remote Desktop, require NLA. This forces users to authenticate before establishing a session, which blocks exploits that target the RDP login screen itself. Also limit RDP access to specific IP addresses or VPN users only.
Step 23: Deploy Certificate-Based Authentication
For high-security environments, replace password-based authentication with certificates. Smart cards or virtual smart cards provide strong two-factor authentication that is extremely resistant to phishing. This is standard practice in government and financial institutions.
Step 24: Enable Memory Integrity (HVCI)
Hypervisor-Protected Code Integrity prevents attackers from loading unsigned drivers into the kernel. This blocks a wide range of rootkit attacks. Enable it through Windows Security → Device Security → Core Isolation → Memory Integrity.
Warning: Some older drivers are not compatible with HVCI. Test thoroughly before deploying to production devices.
Step 25: Automate Compliance Scanning
Hardening is not a one-time task. Configurations drift over time as software installs, updates apply, and users make changes. Set up automated scanning to catch drift.
| Tool | Platform | Cost | Best For |
|---|---|---|---|
| CIS-CAT Pro | Windows, Linux, macOS | Free (Lite) / Paid (Pro) | CIS Benchmark compliance scanning |
| Microsoft Intune | Windows, macOS, iOS, Android | $8-16/user/month | Cloud-managed endpoint compliance |
| Lynis | Linux, macOS | Free (Community) | Linux server hardening audits |
| OpenSCAP | Linux | Free | STIG and CIS automated scanning |
| Nessus | Windows, Linux, macOS | $3,990/year | Vulnerability + compliance scanning |
Hardening Different Device Types
Not every device gets the same treatment. Here is how to prioritize hardening based on device type.
Windows Workstations
Apply all 25 steps where possible. Use Group Policy Objects (GPOs) to enforce settings across the organization. Microsoft provides free Security Compliance Toolkit baselines — download them and import into Group Policy Management.
macOS Endpoints
Apple devices need special attention because many IT teams focus only on Windows. Key macOS-specific hardening steps:
- Enable FileVault (full disk encryption)
- Turn on the built-in firewall with stealth mode
- Disable AirDrop in managed environments
- Control which App Store apps can be installed
- Use MDM profiles to enforce settings at scale
- Enable System Integrity Protection (SIP) — never disable it
Linux Servers
Linux hardening focuses on different areas than desktop systems:
- Disable root SSH login — use sudo with individual accounts
- Configure SSH key-based authentication only (disable password login)
- Set up fail2ban to block brute-force attempts
- Enable SELinux or AppArmor mandatory access controls
- Remove unnecessary packages — each package is potential attack surface
- Configure auditd for security event logging
Mobile Devices (BYOD and Corporate)
Mobile devices need MDM enforcement. At minimum, require:
- PIN/biometric unlock with 6+ digit PIN
- Device encryption (enabled by default on modern iOS and Android)
- Remote wipe capability for lost or stolen devices
- App installation restrictions — allow only approved app stores
- Separation of personal and work data using work profiles
Automating Endpoint Hardening at Scale
Manually hardening each device does not scale. Here are the tools that automate the process for organizations of different sizes.
Small Business (Under 50 Devices)
Use Microsoft Intune with security baselines. Intune includes pre-built hardening profiles based on CIS Benchmarks. Select a baseline, assign it to your device group, and Intune enforces the settings automatically. Cost: $8/user/month as part of Microsoft 365 Business Premium.
Mid-Size Business (50-500 Devices)
Combine Group Policy for domain-joined Windows devices with Intune for remote workers and BYOD. Use PowerShell DSC (Desired State Configuration) scripts to check and enforce settings. Deploy CIS-CAT Pro for regular compliance scans.
Enterprise (500+ Devices)
Use a full configuration management platform like SCCM/MECM, Ansible, Puppet, or Chef. These tools let you define hardening configurations as code, test them in staging, and deploy across thousands of devices. Integrate with your SIEM for continuous compliance monitoring.
7 Common Hardening Mistakes That Backfire
Hardening can actually make things worse if done incorrectly. Avoid these common mistakes:
- Hardening without testing first — Disabling SMBv1 might break legacy printers. Restricting PowerShell might break admin scripts. Always test in a lab environment before rolling out to production.
- Treating hardening as a one-time project — Configurations drift. New software installs change settings. Run compliance scans monthly at minimum.
- Applying the same policy to all devices — A developer workstation needs different settings than a reception desk computer. Create device profiles based on role.
- Ignoring non-Windows devices — Attackers target the weakest link. If your macOS and Linux systems are unhardened, that is where attackers will focus.
- Over-hardening and breaking usability — If security settings prevent people from doing their jobs, they will find workarounds that are even less secure (like sharing admin passwords).
- Not documenting exceptions — When you allow an exception to a hardening rule, document why, who approved it, and when it should be reviewed.
- Forgetting firmware and BIOS — The operating system is not the only software on a device. BIOS/UEFI firmware updates patch critical vulnerabilities too.
Measuring Your Hardening Effectiveness
How do you know if your hardening is actually working? Track these metrics:
| Metric | Target | How to Measure |
|---|---|---|
| CIS Benchmark compliance score | 85%+ (Level 1) | CIS-CAT scan results |
| Devices with admin rights removed | 95%+ of workstations | AD group membership report |
| Disk encryption coverage | 100% of laptops | Intune/SCCM compliance report |
| Patch compliance (30-day window) | 90%+ patched within 30 days | WSUS/Intune update reports |
| MFA adoption rate | 100% of users | Identity provider MFA report |
| Security incidents from endpoints | Decreasing quarter over quarter | SIEM incident reports |
Quick-Start Guide: Harden Your First Device in 30 Minutes
Pick one Windows laptop and do these 10 things right now:
- Run Windows Update — install everything pending
- Turn on BitLocker — Settings → Privacy & Security → Device Encryption
- Switch your daily account to Standard User — create a separate Admin account
- Open Windows Security → Virus & Threat Protection → turn on all protections
- Open Windows Firewall → make sure it is on for all profiles
- Disable Remote Desktop — Settings → System → Remote Desktop → Off
- Set screen lock timeout to 5 minutes
- Open Services (services.msc) → disable Remote Registry and SNMP
- Set up Windows Hello or another MFA method
- Enable audit logging — run
auditpol /set /subcategory:"Logon" /success:enable /failure:enable
Congratulations — you just blocked about 85% of common attacks on that device. Now repeat for every endpoint in your organization, ideally using automation tools to speed things up.
Endpoint hardening is not glamorous. It is not exciting like threat hunting or penetration testing. But it is one of the most effective things you can do to protect your business. A hardened endpoint is a hard target, and attackers prefer easy ones.